Create Indian wedding photos for your wedding album with AI. Cute couple poses, traditional wedding dresses like lehenga, saree, bandhgala and sherwani - all customized to your style.
Upload photos and let AI craft your Indian wedding photos. Cute couple poses, traditional wedding dresses like lehenga, saree, bandhgala and sherwani, and wedding hairstyles - all customized to your style. Professional-grade wedding photos, minus the professional price tag. Save time, money, and look amazing - all without an expensive photographer!
Features:
Wedding Photography
Indian Wedding
Bridal Photos
Wedding Portraits
Wedding Sarees
Wedding Album
AI Wedding
Indian Couple Poses
20 photos included
1,200+ photos generated
Desi Wedding
AI Desi Wedding Photo Generator
Create Desi wedding photos for your wedding album with AI. Cute couple poses, traditional wedding dresses like gharara, saree, bandhgala and sherwani - all customized to your style.
Upload photos and let AI craft your Desi wedding photos. Cute couple poses, traditional wedding dresses like gharara, saree, bandhgala and sherwani, and wedding hairstyles - all customized to your style. Professional-grade wedding photos, minus the professional price tag. Save time, money, and look amazing - all without an expensive photographer!
Features:
Wedding Photography
Indian Wedding
Bridal Photos
Mehndi Photos
Wedding Sarees
Wedding Album
Nikah Photos
Desi Couple Poses
20 photos included
1,200+ photos generated
Valentine's Day
AI Valentine's Day Photo Generator
Create romantic Valentine's Day themed photos. Perfect for cards, social media, or capturing love-filled moments with your special someone.
Transform your photos into a romantic Valentine's Day album. From candlelit dinners to rose-filled scenes, let our AI create the perfect backdrop for your love story. Save time, money, and look amazing - no need for an expensive photographer.
Features:
Valentine's Day
Romantic Photos
Love Letters
Couple Portraits
Romance Photography
Heart Theme
Love Story
Special Moments
40 photos included
1,400+ photos generated
Hairstyle
AI Hairstyle Generator
Try different hairstyles and colors before getting a haircut. Perfect for visualizing your next look or exploring new styles.
Explore endless hair possibilities without the scissors. Upload your photo and let our AI show you how you'd look with any hairstyle or color. Save time, money, and look amazing - no need for an expensive photographer.
Features:
hairstyle ideas
wedding hairstyles
wedding guest hairstyles
hairstyle generator
Hair Design
Beauty Photography
Salon Look
20 photos included
1,600+ photos generated
Professional Headshots
AI Professional Headshot Generator
Transform your selfies into picture-perfect professional headshots in minutes. Upload photos, receive headshots for LinkedIn, CVs, and beyond.
Stand out on LinkedIn and attract more job offers with AI-generated professional headshots. Get up to %180 more job offers from hiring managers. Create an AI model of yourself and generate endless headshots—no need for an expensive photographer. Perfect for LinkedIn, CVs, resumes, and beyond.
Features:
ai headshot generator
ai professional headshot
ai headshots
ai professional headshot generator
Linkedin photos
pfp maker
20 photos included
3,600+ photos generated
Wedding
AI Wedding Photo Generator
Create stunning AI-generated wedding photos. Cute couple poses, stunning wedding dresses and wedding hairstyles - all customized to your style.
Upload photos and let AI craft your perfect day. Cute couple poses, stunning wedding dresses and wedding hairstyles - all customized to your style. Professional-grade wedding photos, minus the professional price tag. Save time, money, and look amazing - no need for an expensive photographer.
Features:
Wedding Photography
Save The Date
Bridal Photos
Wedding Portraits
Wedding Planning
Wedding Album
AI Wedding
Couple Poses
20 photos included
1,200+ photos generated
Nature
AI Nature Photo Generator
Generate outdoor and nature photography with AI.Transform your photos into professional adventure shots with beautiful landscapes and natural backdrops. Perfect for travel content and outdoor enthusiasts.
We'll transform your selfies into a gallery of trekking triumphs and camping memories, set against nature's most stunning backdrops. Save time, money, and look amazing - all without an expensive photographer!
Features:
Nature Photography
Outdoor Portraits
Adventure Photos
Travel Photos
Landscape Photography
Scenic Views
Outdoor Adventure
Wanderlust
20 photos included
800+ photos generated
Mafia
AI Mafia Photo Generator
Channel your inner don or donna with these stylish, vintage-inspired photos. Perfect for themed parties or dramatic social media posts.
Step into the golden age of the mafia with gangster-era portraits. From mafia attire to classic mob style, vintage suits, and timeless sophistication - all without an expensive photographer!
Features:
Vintage Photography
Film Noir
1920s Style
Gatsby Era
Classic Portraits
Dramatic Portraits
Stylized Portraits
Noir Style
20 photos included
950+ photos generated
Cyberpunk
AI Cyberpunk Photo Generator
Dive into the vibrant world of neon-lit cityscapes and cyberpunk aesthetics. Ideal for futuristic themes or eye-catching digital art.
Step into a cyberpunk world with AI-generated futuristic photos! From neon-lit cityscapes to high-tech fashion, create stunning sci-fi portraits and dystopian aesthetics. Experience AI cyberpunk photography like never before—all without an expensive photographer!
Features:
Cyberpunk
Urban Photography
Neon Art
City Lights
Digital Art
Future Fashion
Night Life
Tech Aesthetic
20 photos included
2,200+ photos generated
Holiday 🏖️
AI Holiday Photo Generator
Capture the magic of the holiday season with these festive themed photos. Great for cards, decorations, or spreading holiday joy.
Create stunning holiday photos with AI! From beach vacations to Christmas market strolls, transform your selfies into professional travel photography. Capture honeymoon memories, family holiday pictures, and romantic getaways—all without an expensive photographer!
Features:
Holiday Photos
Christmas Cards
Winter Wonderland
Family Portraits
Seasonal Photography
Holiday Magic
Festive Photos
Season's Greetings
20 photos included
1,500+ photos generated
Engagement
AI Engagement Photo Generator
Celebrate love with these romantic engagement-themed photos. Perfect for announcements, invitations, or capturing special moments.
Turn your selfies into professional engagement photos and romantic pre-wedding pictures in just minutes. DreamShootAI lets you explore couple poses and gorgeous hairstyles. Save time, money, and look amazing - no need for an expensive photographer.
Features:
Engagement Photos
Proposal Pictures
Couple Portraits
pre-wedding photos
Ring Photos
save the date
Romance Photos
Perfect Proposal
20 photos included
1,100+ photos generated
Boudoir
AI Boudoir Photo Generator
Create tasteful and artistic couple boudoir photos. Ideal for private collections or exploring intimate photography.
Experience the art of erotic photography and a sexy photo shoot from the privacy of your home. Try AI lingerie and explore stunning looks—no need for an expensive photographer. Save time, money, and look amazing - no need for an expensive photographer.
Features:
Boudoir Photography
Intimate Portraits
Couple Photos
Artistic Photography
Romantic Pictures
Anniversary Photos
Private Session
Sensual Photography
20 photos included
750+ photos generated
Gala Photos
AI Gala Photo Generator
Generate sophisticated high-class party scenes. Perfect for event planning, invitations, or visualizing elegant gatherings.
From designer gowns and to elegant tuxedos. Upload photos and our AI creates stunning, paparazzi-worthy shots of you two owning the night at the most exclusive galas and balls. Save time, money, and look amazing - no need for an expensive photographer.
Features:
Gala Photos
Luxury Events
Red Carpet
Black Tie
Fashion Photography
Formal Events
High Society
Glamour Shots
20 photos included
1,300+ photos generated
Christmas Couple
AI Christmas Couple Photo Generator
Create magical Christmas couple photos with AI. Romantic moments under the mistletoe, cozy fireplace scenes, snowy winter wonderland portraits perfect for holiday cards.
Make this holiday season unforgettable with DreamShootAI, the premier AI Christmas photo generator for couples and families. Whether you are looking for romantic Christmas couple pictures under the mistletoe or personalized AI holiday photos for your digital cards, our advanced models deliver studio-quality results in seconds. Generate your custom AI Christmas album today and capture the magic of the season with just a few clicks.
Features:
Christmas Photos
Couple Photos
Holiday Cards
Romantic Christmas
Winter Wonderland
Mistletoe Photos
Christmas Portraits
Festive Couple
40 photos included
850+ photos generated
Christmas Photos
AI Christmas Photo Generator
Generate stunning AI Christmas photos with Santa outfits, winter scenes, festive backgrounds and holiday magic. Perfect for cards, gifts, and social media.
DreamShootAI, Worlds's best AI Christmas photo generator. Skip the expensive studio and create realistic AI Christmas photos from the comfort of your home. Whether you are looking for a whimsical AI Christmas portrait in a snowy wonderland, or personalized AI holiday photos for your digital cards, generate your custom AI Christmas album today and capture the magic of the season with just a few clicks.
Features:
Christmas Photos
Holiday Photos
Santa Photos
Winter Photos
Christmas Cards
Festive Photos
AI Christmas
Holiday Magic
40 photos included
1,200+ photos generated
February 13, 2026
How to Fix Overexposed Photos: An Authoritative Guide
Learn how to fix overexposed photo with clear steps for RAW and JPEG, mobile editing apps, and AI tools to recover blown highlights.
It’s a gut-wrenching feeling for any photographer. You capture what seems like a perfect moment, only to discover later that the image is washed out, overly bright, and devoid of crucial detail. This common issue, known as overexposure, occurs when an excess of light overwhelms the camera's sensor.
When this happens, the brightest parts of the photo—the highlights—lose all their textural information and become pure white. In professional photography, this is referred to as having "clipped" or "blown-out" highlights. Think of your camera's sensor as a bucket. Once it’s full of light, any additional light simply spills over, and the data is lost forever.
What Causes Overexposure?
This pervasive issue typically arises from a few common scenarios:
Shooting in Harsh Sunlight: Midday sun is a notorious culprit, often leading to blown-out skies or blindingly bright reflections that destroy detail.
Tricky Backlighting: When shooting a subject against a bright background, such as a window or a sunset, the camera often struggles to balance the extreme light difference, resulting in an overexposed background.
Incorrect Camera Settings: A simple miscalculation, like setting a high ISO in a bright environment or using a shutter speed that’s too slow, can allow an excessive amount of light to hit the sensor.
This isn't just an amateur problem. According to a 2023 market analysis, overexposure affects an estimated 28% of all photos taken on smartphones, a staggering figure when you consider that over 1.7 trillion photos are captured annually. This makes it one of the most universal challenges in digital imaging. You can dig deeper into these photography industry statistics to see the full scope of common issues.
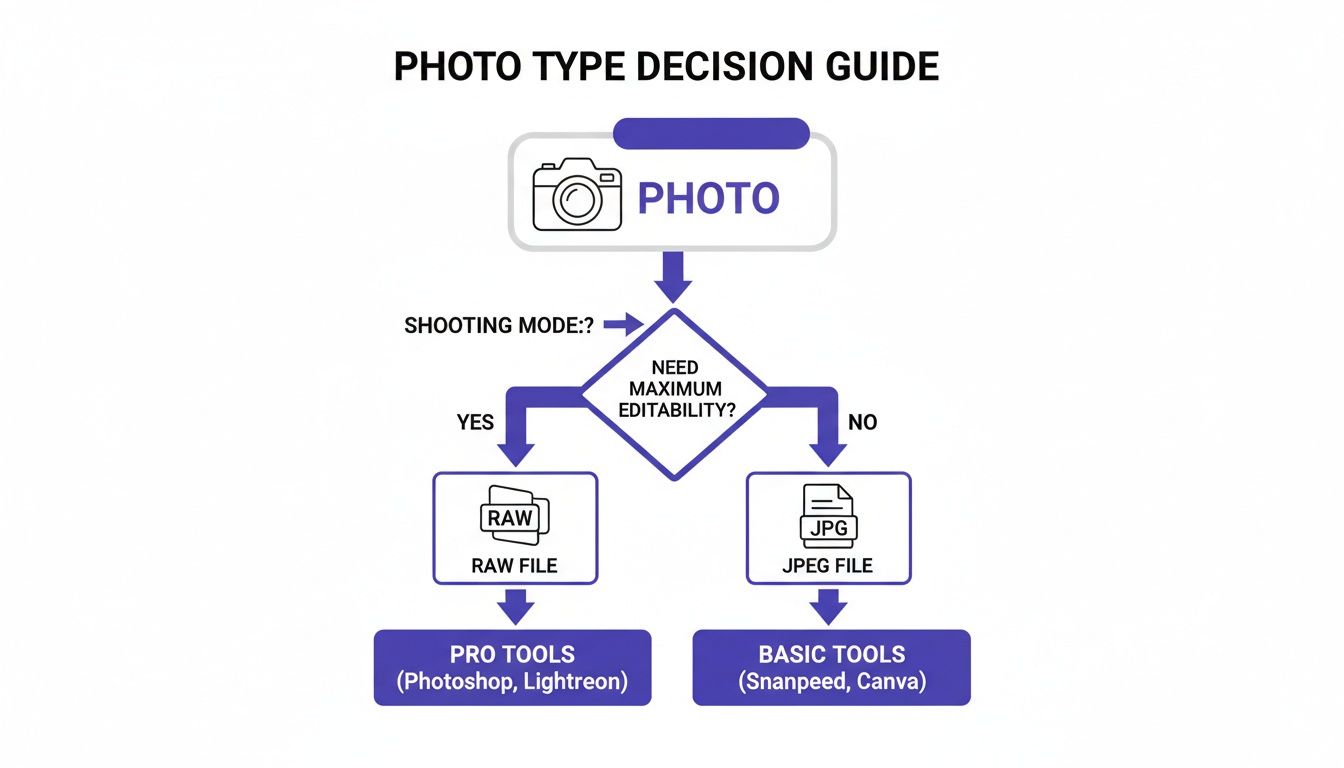
Your First Move: Check if It's RAW or JPEG
Before you touch a single slider, the most critical factor is the file type. Your ability to successfully fix an overexposed photo depends almost entirely on whether you are working with a RAW file or a JPEG.
"Underexposing in camera is the BIGGEST reason for having excessive noise in your photos... That means a photo taken with a lower ISO and underexposed will have MORE grain than an image taken with a higher ISO, but correctly (or even over) exposed."
— Audrey Ann, Founder of Live Snap Love
This flowchart breaks down where to start based on your file type.
As you can see, RAW files are the superior choice for post-production flexibility. They contain the full, unprocessed data from the camera's sensor, providing editing software with a wealth of information to recover lost highlight detail. JPEGs, on the other hand, are compressed and discard much of this data, making recovery significantly more challenging—though not always impossible.
Not sure where to begin? This table provides an authoritative guide to the most effective first step based on your camera and file type.
Scenario
Best First Step
Key Tool to Use
Recovery Potential
DSLR/Mirrorless (RAW)
Pull down the Highlights slider
Highlights/Whites sliders
High
DSLR/Mirrorless (JPEG)
Gently lower the Exposure slider
Exposure/Highlights sliders
Medium
High-End Smartphone (ProRAW/DNG)
Adjust Highlights and Whites
Highlights/Curves
High
Standard Smartphone (JPEG/HEIC)
Lower the Brilliance/Exposure tool
Basic editing sliders
Low to Medium
This should give you a solid starting point for bringing that detail back from the brink. Remember, the goal is to recover detail without making the image look unnatural or flat.
The Pro Workflow for Rescuing Your Photos
Your first instinct when facing an overexposed photo might be to drastically reduce the main 'Exposure' slider. Resist this impulse. While it provides a quick fix, this amateur move darkens the entire image globally, which can render your mid-tones flat and crush valuable detail in the shadows.
Professionals understand that a more surgical approach is required. The key lies in precise, localized adjustments rather than broad, sweeping changes.
In professional editing software like Adobe Lightroom or Photoshop, your most powerful allies are the Highlights and Whites sliders. These are your precision recovery instruments. The Highlights slider specifically targets and reduces the brightness of the most luminous parts of your image without affecting other tonal ranges. The Whites slider sets the absolute brightest point in the photo, giving you definitive control over the upper limit of your tones.
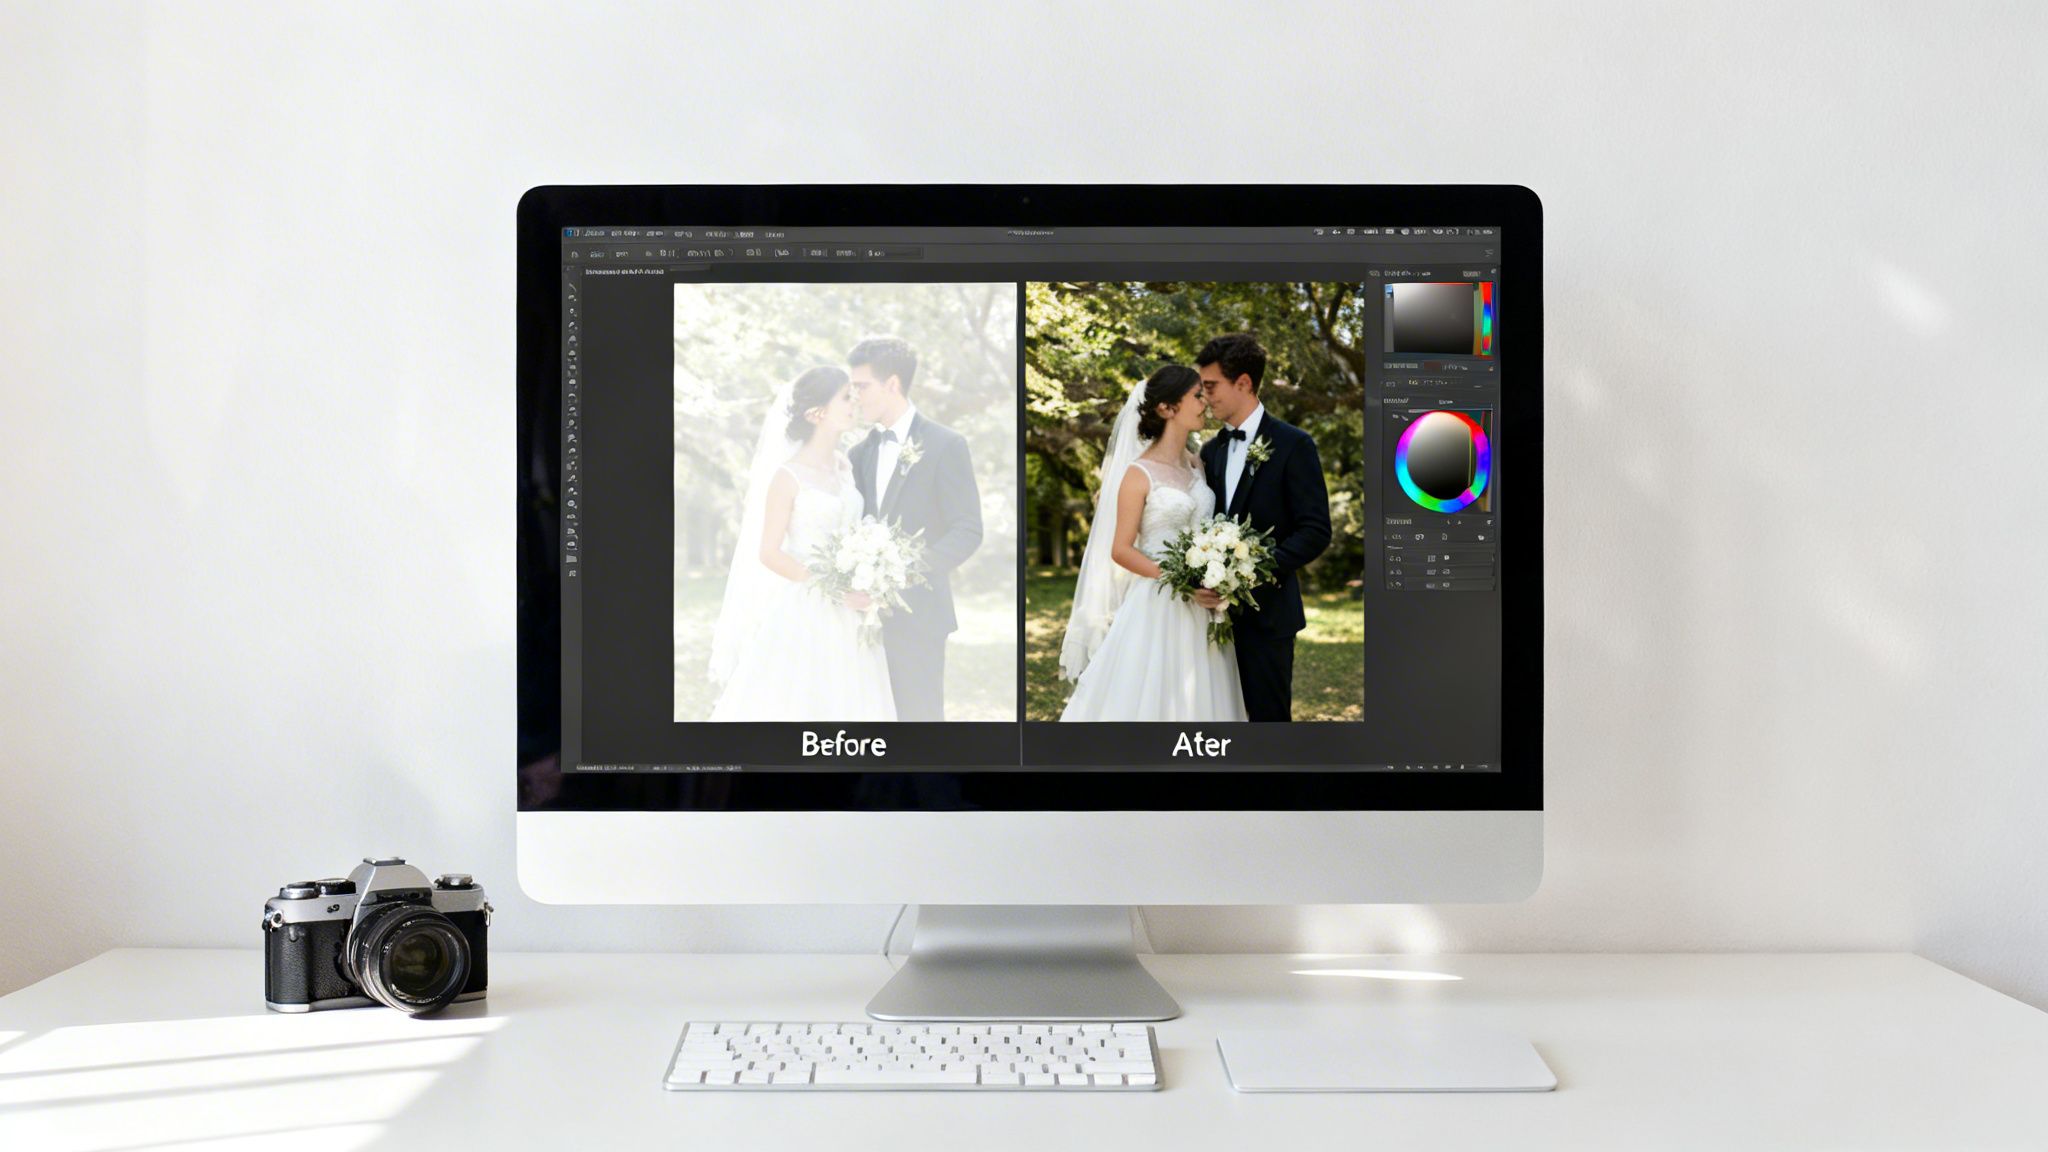
Consider a photograph from a Desi wedding where the intense sunlight has blown out the intricate beadwork on the bride's lehenga. Lowering the overall exposure would dull the rich fabric colors. Instead, by selectively pulling back the Highlights, you can recover every shimmering detail in the embroidery while preserving the vibrancy of the surrounding scene.
Mastering the Tone Sliders
A methodical order of operations is crucial for achieving nuanced control without degrading the image's integrity. This is the professional workflow:
Highlights: Begin here. Gently pull this slider to the left and observe as detail reappears in the blown-out areas—such as clouds in a sky or the delicate texture of a white wedding dress. Stop once the detail is restored.
Whites: Next, hold Alt (Windows) or Option (Mac) while dragging the Whites slider. Your screen will turn black. Pull the slider to the left until only a few minimal white specks remain. This establishes a true white point without "clipping," ensuring no detail is lost at the brightest end of the spectrum.
Shadows and Blacks: With your highlights managed, you can now gently lift the Shadows slider to recover information in the darker regions. Finally, use the Blacks slider (using the same Alt/Option key technique) to set a deep, true black point, which adds critical contrast and depth.
This is a delicate balance. You are not merely darkening the photo; you are redistributing the light to more accurately reflect the original scene.
Adding Depth with the Curves Tool
After rebalancing the tones, the image may appear somewhat flat—a common side effect of highlight recovery. This is where the Curves tool becomes indispensable for reintroducing contrast and "punch." No other tool offers more granular control over brightness and contrast.
For a classic, effective adjustment, apply a gentle S-curve. Click the center of the diagonal line to anchor your mid-tones. Then, elevate the upper portion of the line to brighten the highlights and depress the lower portion to deepen the shadows. This single tweak restores contrast in a far more natural and sophisticated manner than the basic contrast slider ever could.
"A professional photographer’s most valuable asset is time. Overexposed images are a massive time-sink, turning a simple edit into a meticulous rescue mission to meet client expectations for flawless, high-quality results."
— Sarah Jenkins, Commercial Photography Editor
Efficiency is paramount. The latest State of the Industry report reveals that rising operational costs make post-production speed a critical factor for profitability. In fact, overexposed photos occur in approximately 20% of professional event and portrait sessions, increasing editing time by as much as 35% as photographers painstakingly recover clipped highlights. You can explore the full industry report to see the other challenges pros are facing. Mastering these tools isn’t just about creating superior images—it’s about reclaiming your time.
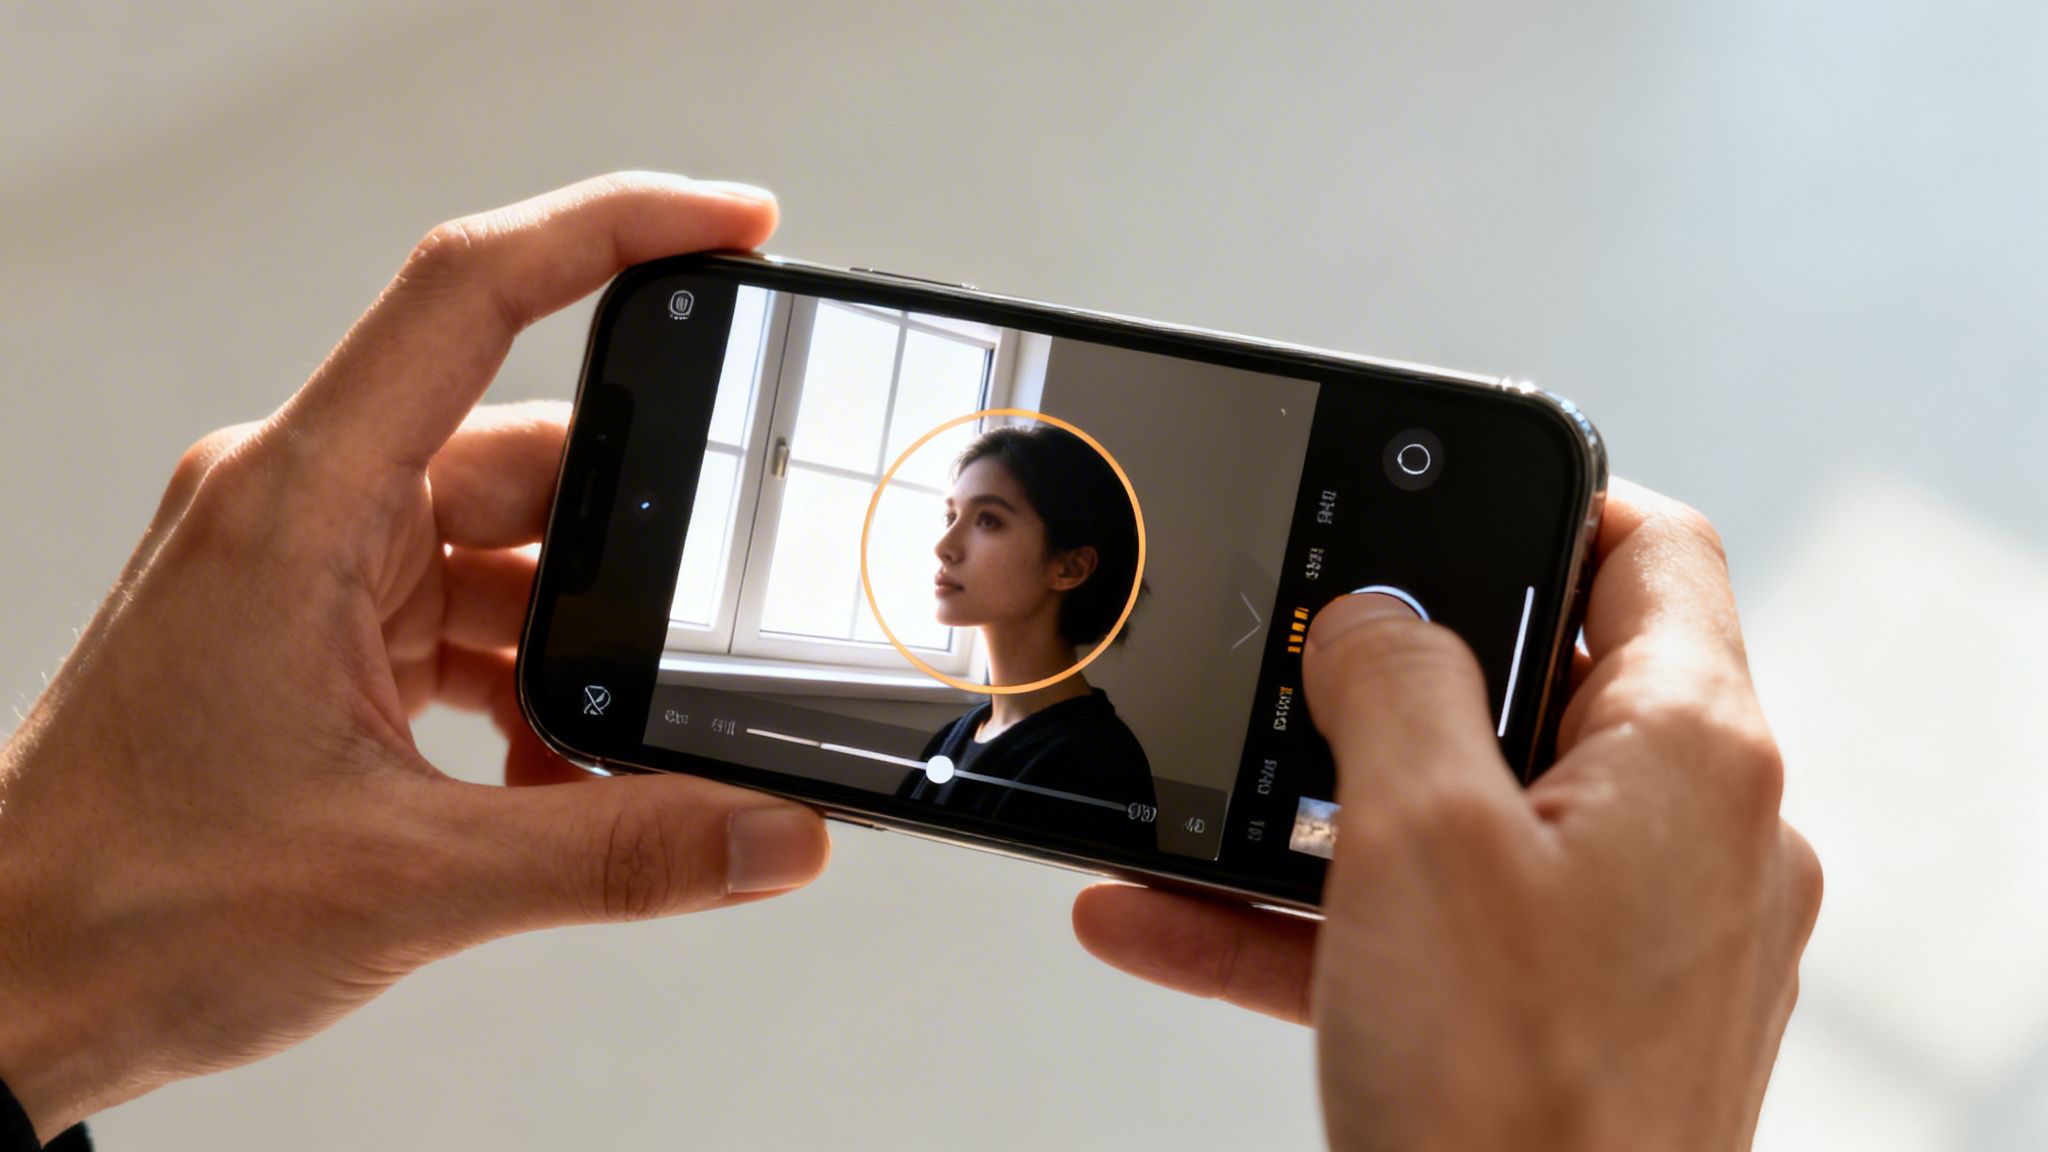
Fixing Overexposed Photos on Your Smartphone
You don't need a high-end desktop setup to rescue a blown-out shot. The powerful camera in your pocket is equipped with sophisticated editing tools, transforming what was once a complex darkroom process into an accessible fix. This is particularly significant given that, according to Statista, an estimated 94% of photos are now captured on smartphones.
Most native applications, such as Apple Photos or Google Photos, feature surprisingly robust controls. You can easily correct an overexposed photo by targeting only the brightest areas, leaving the rest of the image untouched.
Here's a pro tip: resist the initial urge to simply decrease the main "Exposure" or "Brightness" slider. Instead, seek out more nuanced tools like Brilliance, Highlights, and Shadows. These provide surgical control, allowing you to tone down hotspots—like a bright sky behind a friend in a selfie—without making their face appear unnaturally dark.
Quick Fixes in Your Native Photo App
Your phone's default photo app is the most efficient place to start. While the tool names may vary slightly between iOS and Android, the core principles are identical. Imagine a cityscape photo where the clouds are excessively bright.
Here’s a quick, effective workflow:
Tackle the Highlights First: Locate the "Highlights" slider and move it to the left. You will see detail in the clouds begin to reappear.
Adjust Brilliance or Ambiance: This intelligent tool brightens shadows while simultaneously toning down highlights, often achieving a more balanced look with a single adjustment.
Bring Back the Punch: After reducing the highlights, the photo might look flat or muddy. A small increase to the "Contrast" slider will restore depth and make the image pop.
This simple sequence offers fine-tuned control and is an excellent way to learn how to fix an overexposed photo using the tools you already possess.
"Don't be scared of ramping up the ISO to get the exposure right. It’s MUCH better to have a higher ISO number and correctly expose, than use a lower ISO number and underexpose."
— Audrey Ann, Founder of Live Snap Love
Level Up with Dedicated Editing Apps
For even greater precision, dedicated apps like Snapseed or VSCO are invaluable. Snapseed’s Selective tool, in particular, is a game-changer for challenging situations.
Consider an indoor shot where a bright window is blowing out all detail. With the Selective tool, you can place a control point directly on the window. From there, you can pinch to resize the adjustment area and swipe to reduce the brightness of only that specific spot.
This technique is ideal for isolating and correcting specific overexposed areas without affecting your main subject, turning a flawed image into a perfectly balanced, shareable post in minutes.
Using AI for Smarter Photo Exposure Correction
While manual editing provides ultimate control, it is not always the most efficient method to fix an overexposed photo. It can be a significant time investment. This is where modern AI tools are revolutionizing the process, offering a faster, more intuitive path to professional-grade results—often with a single click or a simple text command.
This is not merely about speed; it's about making complex corrections accessible to everyone, regardless of their technical expertise with tools like the curves graph.
The true power of AI lies in its contextual understanding. Instead of blindly lowering brightness across the entire image, an AI algorithm analyzes the photo's content. It can identify a face, a blown-out sky, or a detailed foreground and apply intelligent, targeted adjustments. This means it can rescue delicate clouds in the sky without plunging a beautiful landscape into unnatural darkness. It comprehends the difference between an intentionally bright aesthetic and an accidental overexposure.
The drive for this technology stems from a real market need. With an estimated 14.3 trillion photos in existence and overexposure affecting nearly 28% of smartphone images, the demand for efficient solutions is immense. This trend is a major factor in the photo editing software market's projection to reach $1.5 billion by 2031, with AI solutions leading this growth. For more on these figures, see the analysis of photography statistics on greatbigphotographyworld.com.
Editing Photos with Simple Prompts
One of the most significant advancements in AI editing is the use of natural language processing. Instead of manipulating sliders and adjustment layers, tools like DreamShootAI's 'Photo Edit by Prompt' allow you to simply describe the desired changes, as you would to a human editor, eliminating technical jargon.
For a portrait where the background is completely washed out, instead of the tedious process of masking and layering, you could type a prompt like:
"Reduce the glare on my face and make the background colors richer."
"Fix the overexposed window behind me and balance the lighting."
"Tone down the bright sunlight on my shirt and enhance the details."
The AI interprets these commands and automatically applies a series of complex edits, bypassing a steep learning curve. It's the ideal approach for anyone seeking professional results without getting mired in technical details.
This screenshot from DreamShootAI's photo editor illustrates the simplicity.
A straightforward text box allows you to input your edits, turning a once-complex task into a simple conversation.
Beyond Exposure with AI Upscalers
AI doesn't just tweak existing pixels; it can intelligently enhance and reconstruct them. This is a critical advantage for JPEGs or smartphone photos where overexposure has caused a permanent loss of data. A tool like the Magic Upscaler does far more than just increase resolution.
As part of its upscaling process, it analyzes and corrects flaws in lighting and exposure. It can intelligently reconstruct lost texture in clipped highlights, mitigate noise introduced by aggressive edits, and sharpen details that were previously washed out. It's a dual-action benefit: you're not just correcting exposure, you're fundamentally enhancing the image's overall quality and clarity. We delve deeper into this in our guide on how to improve photo quality.
"In my work, efficiency is non-negotiable. AI editing tools have become my secret weapon for batch-correcting event photos, turning what used to be hours of tedious adjustments into a task that takes minutes. The consistency and quality are remarkable."
— Alex Rivera, Professional Event Photographer
Ultimately, using AI to fix an overexposed photo is about reclaiming your time and creative energy. It allows you to focus on the artistic vision for your image instead of getting bogged down in the technical challenges of recovery.
Advanced Techniques for Flawless Results
When standard sliders fail to deliver the required precision, it's time to employ professional-level tools. While basic adjustments are excellent for quick, global fixes, they often lack the surgical accuracy needed for complex lighting scenarios. This is where advanced techniques become essential, allowing you to target and rescue overexposed areas without compromising the rest of your image.
These methods provide the pinpoint control necessary to recover the delicate texture in a bride's lace veil or perfectly balance the light in a composite image. Mastering them is what distinguishes a competent edit from a truly flawless one.
Harnessing the Power of Luminosity Masking
The single greatest challenge in exposure correction is isolation. How do you darken a blown-out sky without turning the mountains below into a muddy, underexposed mess? The answer is luminosity masking, an exceptionally powerful feature in software like Photoshop.
Instead of relying on imprecise brushwork or selections based on shape, luminosity masks create selections based purely on brightness values. This allows you to generate a mask that targets only the brightest pixels in your photo with unparalleled accuracy.
"A precise selection is the foundation of a believable edit. Luminosity masks are the most accurate way to isolate highlights, letting you make aggressive adjustments that look completely natural because they only affect the areas that need it."
— Nik Bhatt, Veteran Photo Software Developer
Once you have a luminosity mask applied to an adjustment layer (such as Curves or Exposure), you can aggressively reduce the brightness of just the highlights. The key benefit is that the adjustment feathers seamlessly into the midtones, creating a clean, natural recovery that is virtually impossible to achieve with a manual brush.
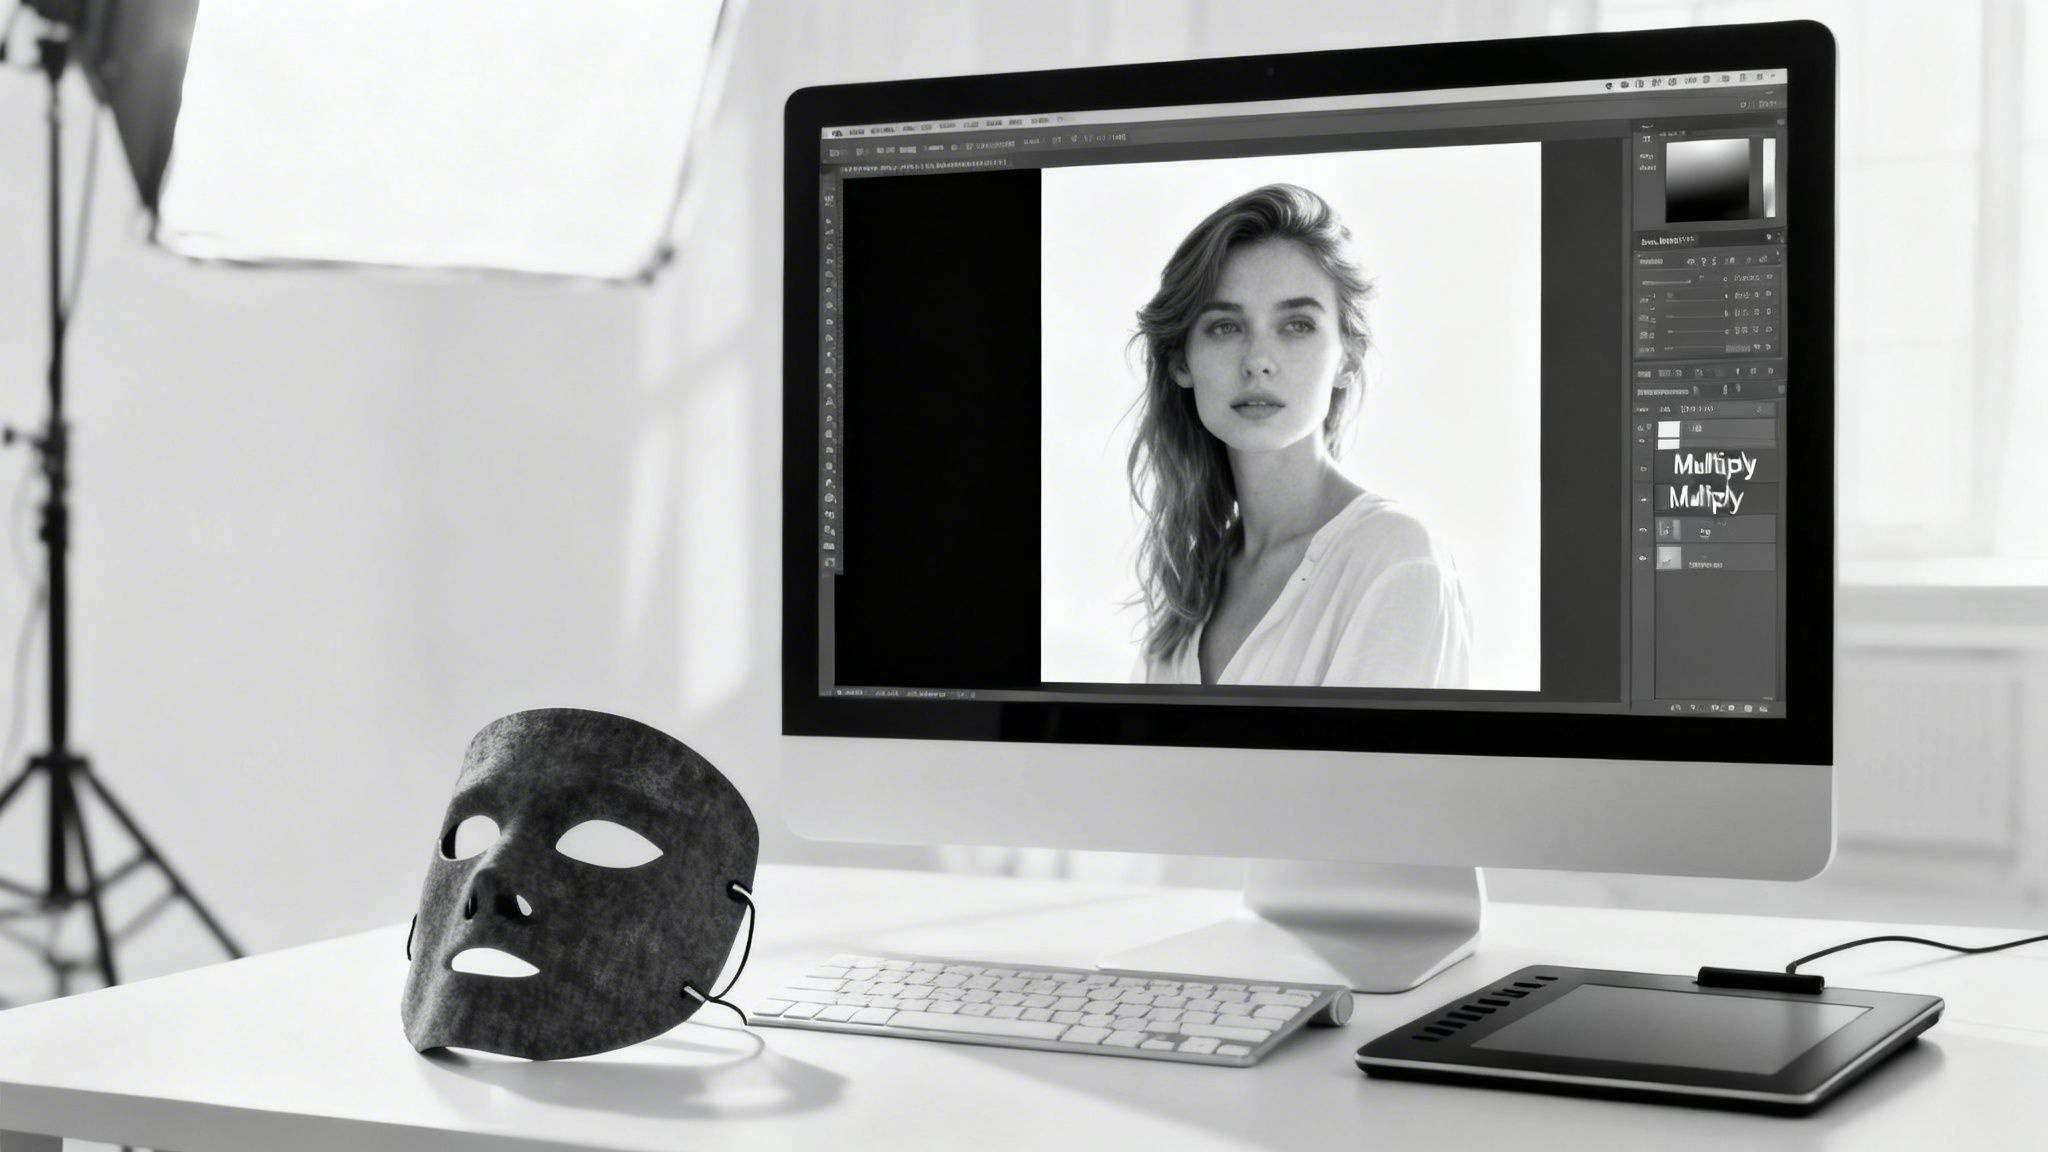
Layer Blending for Quick and Effective Fixes
Sometimes a faster solution is needed that still offers more control than a simple slider. This is where Layer Blending Modes in Photoshop become a secret weapon. The 'Multiply' blend mode, in particular, is a lifesaver for taming overexposure.
Here’s a simple but powerful workflow:
Duplicate Your Layer: First, create a copy of your main image layer.
Change the Blend Mode: Set the blend mode of this new top layer to Multiply. Your entire image will darken and become more saturated.
Mask It Out: Add a layer mask to this "multiplied" layer and fill it with black, completely hiding the darkening effect.
Paint Back the Fix: Select a soft, white brush with a low opacity (start around 10-20%) and gently paint over only the overexposed areas. This selectively reveals the darker layer precisely where needed.
This technique is brilliant because it allows you to build up the correction gradually, providing total control over the intensity. It is highly effective for bright skies, specular reflections on skin, and other blown-out surfaces.
Combining Techniques for Ultimate Control
True mastery comes from combining methods. An expert workflow isn't about finding a single perfect tool but about layering several techniques to achieve the desired outcome.
For instance, you could begin with a luminosity mask on a Curves layer to handle the primary highlight recovery. Afterward, you might notice a few remaining hot spots. You can then use the 'Multiply' blending trick on a separate layer to add extra density just to those specific areas.
By layering these advanced adjustments, you can deconstruct the problem and address each component with the most appropriate tool. This is what separates good edits from truly great ones, ensuring your final image looks balanced, detailed, and completely authentic. For a deeper dive into taking your image's look to the next level, our guide to professional photo colour grading is a great next step.
How to Avoid Overexposure in the First Place
While the recovery techniques discussed are invaluable, the most effective way to fix an overexposed photo is to prevent it from happening at all. Getting the exposure correct in-camera not only saves significant editing time but also ensures you start with the highest quality file possible.
The first step toward creative control is moving beyond your camera's automatic mode. Relying on the camera's judgment is a gamble, especially in difficult lighting. Mastering a few key settings will put you in control, allowing you to dictate the final look of your photos.
Metering for Precision
Your camera’s light meter attempts to average a scene to a neutral gray. While this works for simple scenes, in challenging situations—like a portrait against a bright sky—it often results in a blown-out background or an underexposed subject.
This is where spot metering becomes a critical tool.
Instead of averaging light across the entire frame, spot metering measures light from a single, specific point. For a perfect portrait, aim that spot directly at your subject's face. This instructs the camera to prioritize their skin tone, ensuring it is exposed correctly. The background can then fall where it may, often creating a more dramatic and professional result.
Using Your Histogram as the Ultimate Guide
Do not rely solely on your camera's LCD screen; it can be deceptive. Bright sunlight can make an image appear darker than it is, while a dark room can make it seem brighter. The histogram is your only truly objective tool for achieving perfect exposure in the field.
This graph displays the tonal range of your photo, from pure black on the left to pure white on the right.
A large peak bunched up on the far right indicates significant highlights that are in danger of being clipped.
An ideal histogram shows a balanced distribution of tones across the graph, without any hard "spikes" pressed against either end.
"Under-exposing in camera is the BIGGEST reason for having excessive noise in your photos... That means a photo taken with a lower ISO and underexposed will have MORE grain than an image taken with a higher ISO, but correctly (or even over) exposed."
— Audrey Ann, Founder of Live Snap Love
Monitoring your histogram in live view allows you to adjust your settings before you press the shutter, ensuring you never lose crucial highlight details again.
Taking Control with Exposure Compensation
Even when shooting in a semi-automatic mode, you have a powerful override: Exposure Compensation. Usually marked with a +/- symbol (or EV), this feature lets you tell your camera to make the image brighter or darker than its metered reading.
Consider a classic tricky scenario: shooting in snow. Your camera sees all that white and tries to render it as a dull gray, resulting in an underexposed image. By dialing your EV up to +1 or +2, you are instructing the camera to intentionally overexpose its initial reading, which produces bright, clean snow. The same logic applies to dark scenes; dialing down to -1 can prevent the camera from blowing out highlights.
Beyond camera settings, the smartphone you use can also make a significant difference. It's worth exploring how different Samsung vs iPhone camera systems handle challenging lighting. Mastering these in-camera skills is the final step in your journey—moving from fixing photos to creating them perfectly from the start.
Your Top Overexposure Questions, Answered
Fixing blown-out highlights can be a source of confusion. Let's address some of the most common questions photographers face when dealing with an overexposed photo.
Can I really save a totally white, blown-out area?
If a portion of your photo is pure, solid white, it is "clipped." This means the camera sensor recorded zero detail in that area. With traditional editing sliders, the best you can typically achieve is converting that white patch into a flat, lifeless gray.
This is where modern AI editors are a game-changer. They can analyze surrounding pixels—colors, textures, and patterns—and intelligently reconstruct what might have been there. While not infallible, the results can be remarkable. This is also why shooting in RAW is non-negotiable for serious photographers; it retains significantly more data, providing both you and the AI a much better chance at a believable recovery.
"A photo taken with a lower ISO and underexposed will have MORE grain than an image taken with a higher ISO, but correctly (or even over) exposed."
— Audrey Ann, Founder of Live Snap Love
Does fixing overexposure ruin my photo's quality?
If you are working with a RAW file, you can generally correct overexposure with minimal to no degradation in quality. RAW files are designed for this kind of intensive adjustment, containing a vast amount of "hidden" information in the highlights and shadows that can be recovered.
JPEGs are a different matter. As compressed files, aggressive exposure corrections can quickly introduce digital noise, color banding, and other undesirable artifacts. While advanced AI tools and non-destructive editors can mitigate the damage, nothing surpasses the quality of a correctly exposed image captured in-camera.
So, how much should I actually lower the exposure?
There is no universal setting. The correct amount is determined by visual assessment rather than a specific number. The process is more art than science, relying on your judgment and the histogram.
Begin by reducing the Highlights or Exposure sliders. Closely observe the brightest parts of the image, watching for detail to reappear. Simultaneously, monitor your histogram—you want to see the spike on the far-right edge move back toward the middle, confirming that you are no longer clipping the highlights.
Be cautious not to overdo it. Stop before the image looks muddy, unnaturally dark, or loses its dynamic range. The objective is always a natural, balanced final image, not one that shows obvious signs of heavy-handed correction.
Tired of wrestling with sliders? DreamShootAI can fix your lighting, sharpen details, and upscale photos with a simple text command. Give the Photo Edit by Prompt feature at DreamShootAI a shot and see how fast you can get pro-level results.
how to fix overexposed photophoto exposure correctionphoto editing tipsAI photo editingphotography rescue