You can remove red eye from photos using the editor built into your phone, dedicated software like Photoshop, or even modern AI tools that fix the issue with a simple text prompt. The best method depends on your needs, but today's solutions have made this once-tedious task nearly instant.
Why That Red Glow Haunts Your Photos
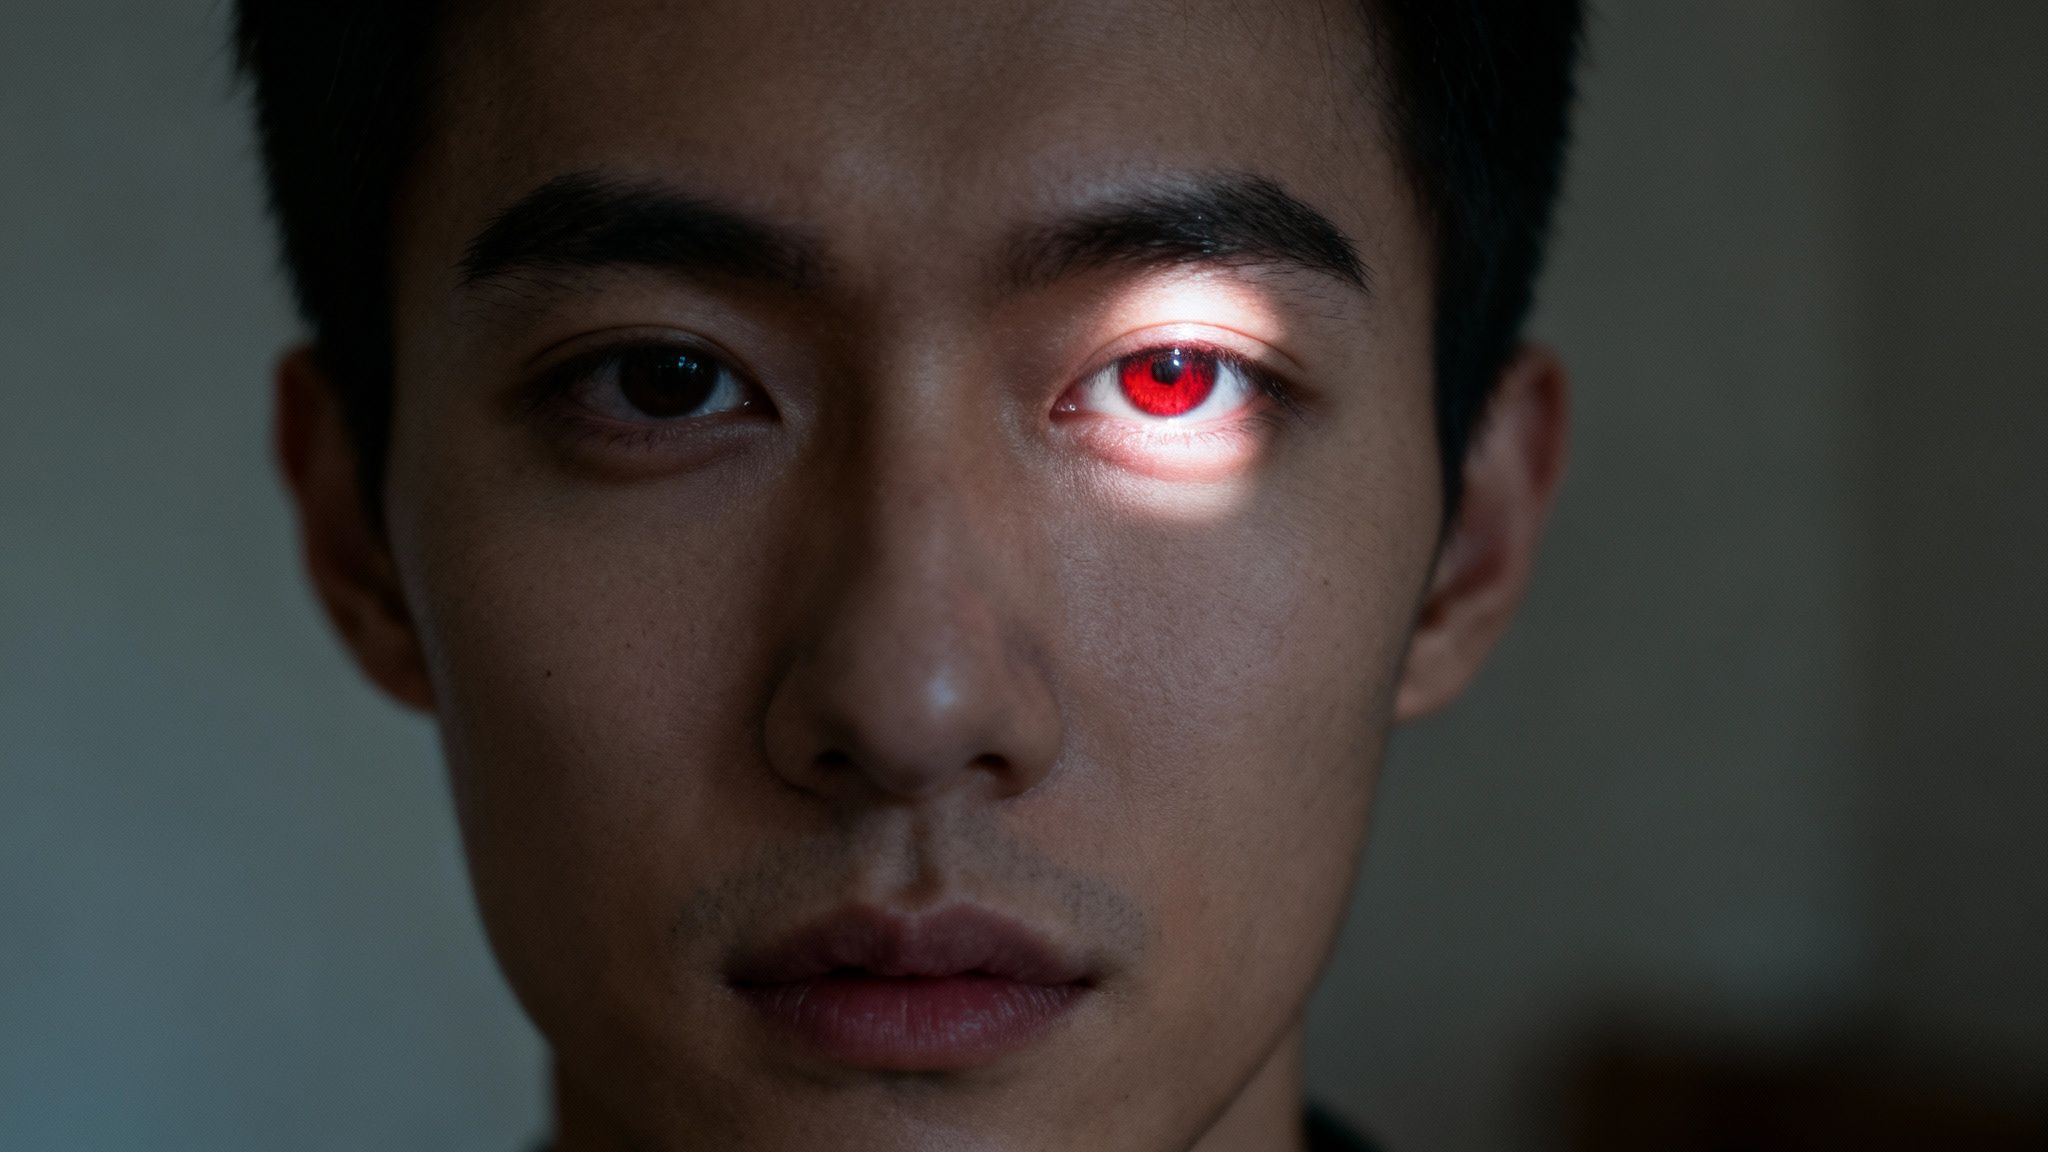
We’ve all been there. You snap an otherwise perfect photo in a dark room, only to find your subject has glowing, demonic-looking eyes. It's a common frustration, but that eerie phenomenon, known as the red-eye effect, is just a simple trick of light and biology.
It happens when your camera's flash is too close to its lens. In a low-light setting, your subject's pupils are wide open to let in more light. The flash fires a quick burst that travels right through the pupil, bouncing off the retina at the back of the eye. Because the retina is packed with blood vessels, the reflected light picks up that distinct red color, and the camera captures it. The American Academy of Ophthalmology explains this is simply the camera capturing the blood-rich fundus at the back of the eye.
The Evolution of Red Eye Correction
The struggle to fix red eye has been around since flash photography first lit up scenes back in the 1930s. For decades, it was just an accepted, unavoidable flaw.
The real game-changer was digital editing. Suddenly, we had tools to fight back. The photo editing software market, where red eye removal is a staple feature, is now projected to grow by USD 606.1 million between 2024 and 2029. It’s clear this is a feature photographers at every level care about. You can learn more about the growth of the photo editing industry and its impact.
"The red-eye tool in early versions of Photoshop was a revelation," states a senior editor at a leading photography journal. "It turned a previously unsalvageable photo into a cherished memory with a few clicks. Today, AI has taken that convenience to a whole new level."
From those early manual fixes, technology has raced ahead to one-click solutions and even AI prompts that require zero technical skill. Flawless portraits are now accessible to everyone.
To give you a quick lay of the land, here’s a look at the different approaches you can take.
Red Eye Removal Methods At a Glance
Choosing the right tool can feel overwhelming, so this table breaks down the most common methods. Whether you need a quick fix on your phone or a precise edit for a professional print, here's how they stack up.
| Method |
Best For |
Speed |
Ease of Use |
| In-Camera Settings |
Preventing red eye before it happens; group photos at events. |
Instant |
Very Easy |
| Manual Editing (Photoshop/Lightroom) |
Professional photographers needing precise control over color and detail. |
Slow |
Difficult |
| One-Click Automatic Tools |
Quick, hassle-free fixes for casual photos on mobile or desktop. |
Very Fast |
Very Easy |
| AI Prompt-Based Editing |
Batch processing and achieving natural-looking results with minimal effort. |
Fast |
Easy |
Each method has its place. Prevention is always best, but when that fails, it’s great to know that a quick, easy fix is just a few clicks—or a single sentence—away.
How to Avoid Red Eye Before It Happens
Let's be honest, the best way to fix red eye is to ensure it never shows up in the first place. While you can always clean it up in post-production, preventing it from the get-go saves a ton of editing time and keeps your original photo crisp and clean. A few small tweaks during your shoot can make a massive difference.
Almost every modern digital camera—and even your smartphone—has a built-in red-eye reduction mode. It’s usually a simple setting you can switch on. This feature fires off a few quick, bright pre-flashes right before the main flash. That burst of light makes your subject's pupils shrink, which dramatically reduces the chances of that creepy red reflection bouncing back into your lens.
Adjust Your Lighting Environment
Red eye is the classic symptom of a bright flash in a dark room. So, the most straightforward fix is to brighten up the space. Just turn on a few more lamps or move your subject to a better-lit part of the room. This encourages their pupils to constrict naturally.
With smaller pupils, the flash has a much smaller target to reflect off of. In many cases, if you add enough ambient light, you might even be able to skip the flash altogether. For a deeper dive into making your space photo-ready, check out our guide on the best lighting for indoor photography.
The angle of your flash is also a huge factor. The pop-up flash on your camera is the biggest culprit because it’s so close to the lens, creating a direct line of sight for that reflection. If you have an external flash, you've got a major advantage.
"Bouncing the flash off a ceiling or wall is my go-to trick," says a veteran portrait photographer with over 20 years of experience. "It creates softer, more natural light and completely avoids red eye by changing the angle of reflection."
By changing the flash's angle, you stop the light from reflecting straight back into the camera. Here are a few things you can try right away:
- Angle the flash away: If you're using an external flash, just point it slightly up or to the side instead of directly at your subject.
- Bounce the light: Aim your flash at a neutral surface like a white ceiling or a light-colored wall. This diffuses the light, scattering it for a much softer, more flattering look.
- Use a diffuser: A simple flash diffuser is an inexpensive accessory that can soften that harsh light, which also minimizes the intensity of the reflection.
Mastering these simple preventive steps means you'll spend less time staring at a computer screen fixing photos and more time enjoying the great moments you've captured.
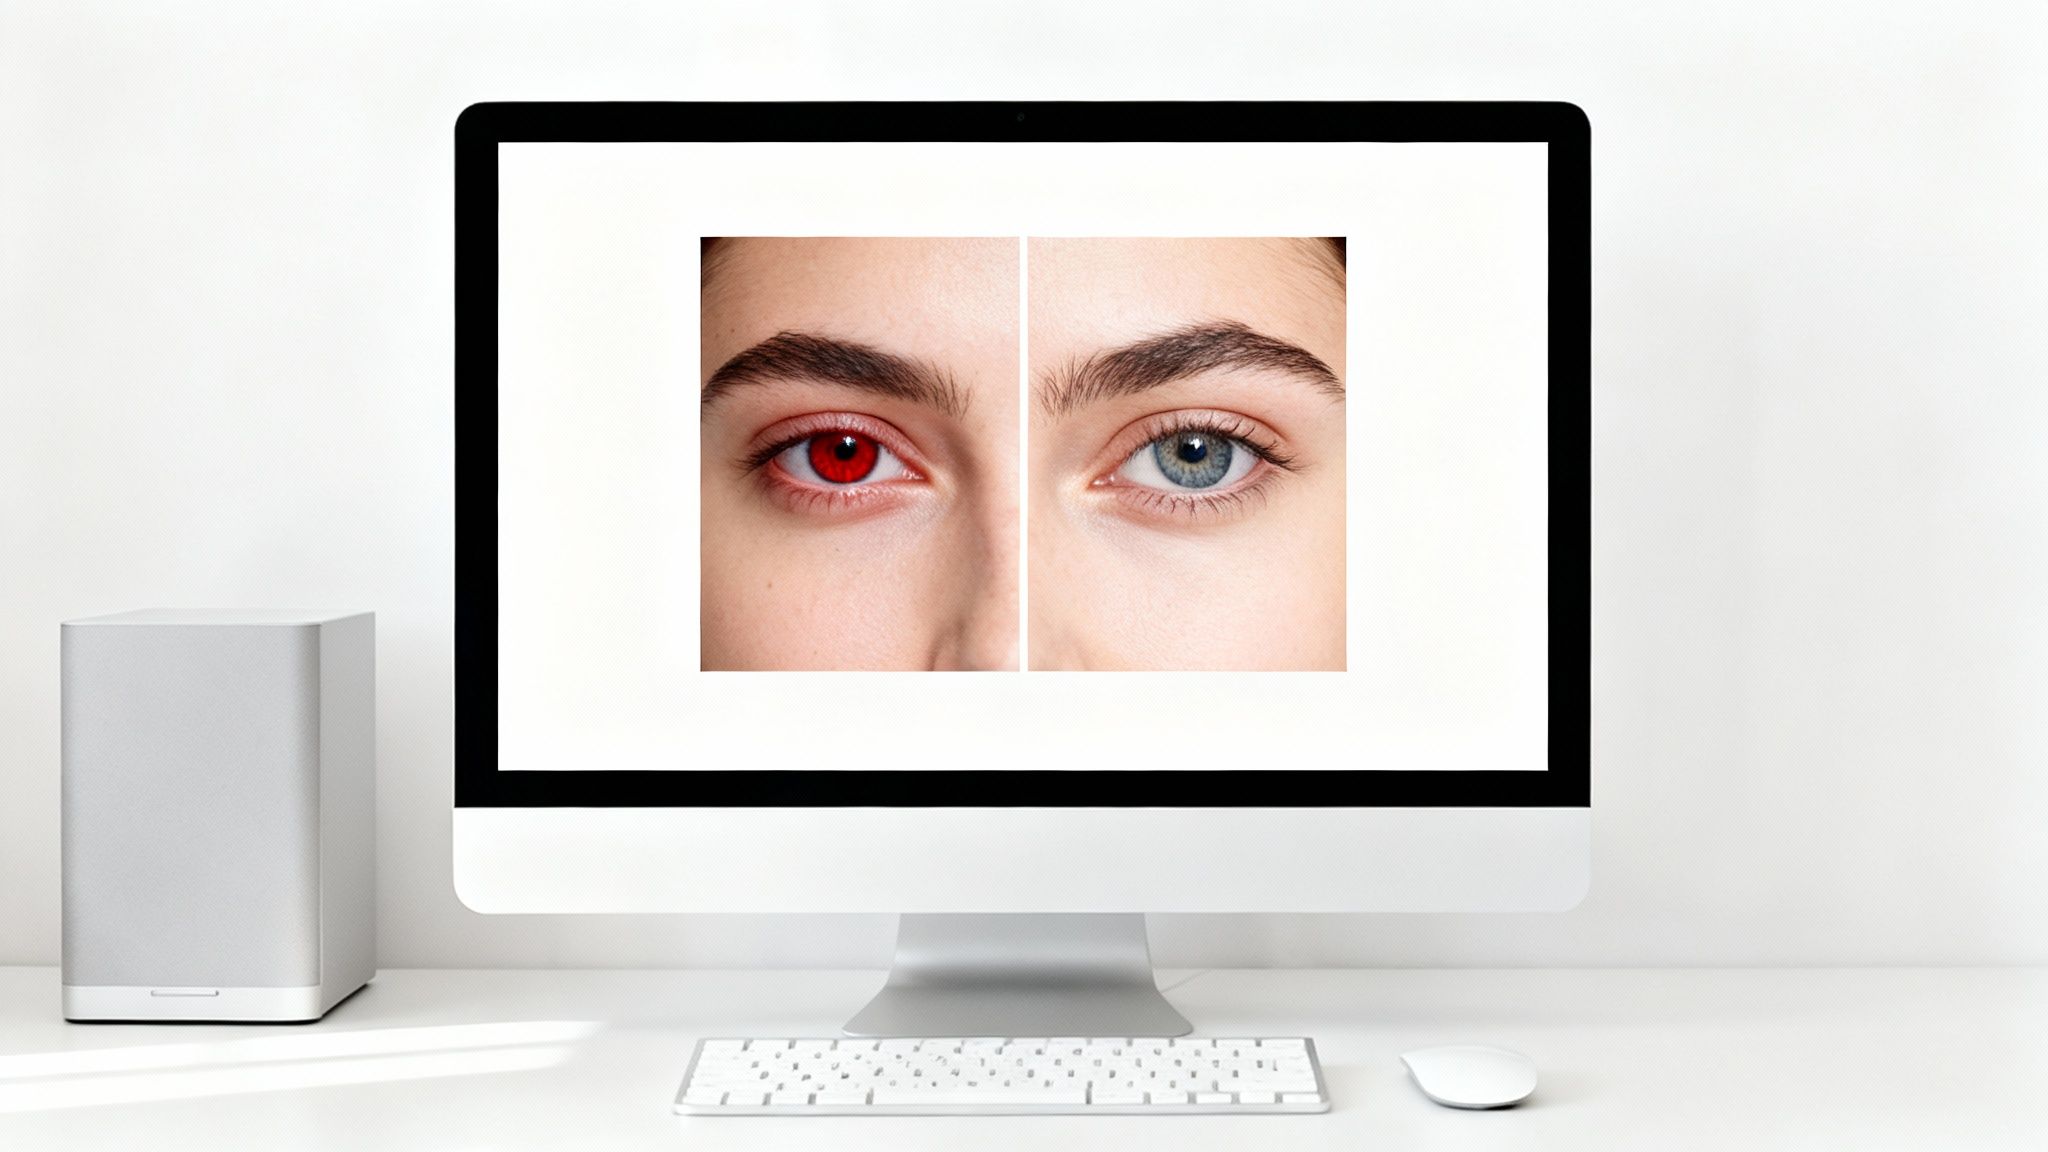
So, you've got a photo with that pesky red-eye glare. Now what? You're basically at a fork in the road with two main options: the old-school, hands-on manual fix or the new-school, automated AI solution. Both get you to the same destination—natural-looking eyes—but the journey is completely different. Your best bet really depends on how much time you have and how comfortable you are with editing software.
The Old-School Way: Going Manual
The manual approach is all about control. Think of yourself as a digital surgeon, armed with a tool like Adobe Photoshop. You'll zoom way in, carefully select just the pupil, desaturate that jarring red channel, and then tweak the brightness and darkness until it looks like a real eye again.
It’s a craft, no doubt. You have pixel-level control, which is great for tricky situations. But let's be honest, it takes time, a steady hand, and a decent grasp of how photo editing works. It’s not exactly a quick fix when you’ve got a whole gallery of wedding photos to get through.
The New Way: Intelligent Automation
On the other side, you have AI-powered tools that have completely flipped the script. Instead of you doing all the work, these platforms do the heavy lifting. They scan the image, find the faces, pinpoint the pupils, and zap the red-eye automatically. Often, it’s done with just a single click or a simple text command.
This is where a tool like DreamShootAI's Photo Edit feature really comes into its own. You just upload your picture and type something like, "remove the red eye and make the eyes look natural." The AI takes it from there, restoring the original eye color and texture without you having to mess with a single slider.
"AI-driven correction has revolutionized my workflow," explains an industry expert in post-production. "A task that used to take minutes per photo is now done in seconds, cutting down my red-eye correction time by as much as 90%. It lets me focus on the creative side of editing instead of getting bogged down in repetitive fixes."
This isn’t just about being faster; it’s about making professional-quality results available to everyone, no steep learning curve required.
How Does The AI Get It Right?
The secret sauce is all in the data. Modern AI is built on a massive understanding of visual information, a field that’s growing at an incredible pace. Just look at the global eye-tracking solutions market—which Meticulous Research valued at USD 1.45 billion in 2025—it’s projected to explode to USD 5.48 billion by 2030.
This boom is what helps an AI detect eye imperfections with such precision. Advanced algorithms can analyze everything from gaze to pupil dilation, allowing them to auto-correct red-eye with up to 95% accuracy. That's a huge jump from the 70% success rate of older software. You can read more about the rapid growth of eye-tracking technology and how it’s fueling these advancements.
Manual vs. AI Red Eye Correction
To make the choice clearer, let’s break down the key differences between wrestling with layers in Photoshop and letting an AI handle the job.
| Feature |
Manual Editing (e.g., Photoshop) |
AI Editing (e.g., DreamShootAI) |
| Process |
Multi-step: select pupil, desaturate red, adjust brightness, repeat. |
One-step: upload photo and use a simple prompt or click a button. |
| Time Investment |
Minutes per eye; can be very time-consuming for multiple photos. |
Seconds per photo, perfect for batch processing. |
| Skill Level |
Intermediate to advanced; requires knowledge of editing tools. |
Beginner-friendly; no technical skill needed. |
| Control |
Granular, pixel-level control over the final look. |
Less direct control, but smart algorithms aim for natural results. |
| Consistency |
Can vary between photos depending on user skill and patience. |
Highly consistent results across hundreds of images. |
| Best For |
Complex images, artistic edits, and users who want total control. |
Quick fixes, large batches of photos, and achieving professional results easily. |
Ultimately, both methods have their place. Manual editing gives you ultimate power, but AI gives you ultimate convenience. For most everyday needs, especially when you’re short on time, AI is the clear winner.
Prevention Is Better Than a Cure
Of course, the easiest way to deal with red-eye is to avoid it in the first place. This flowchart gives you a quick guide on how to stop it from happening before you even press the shutter.
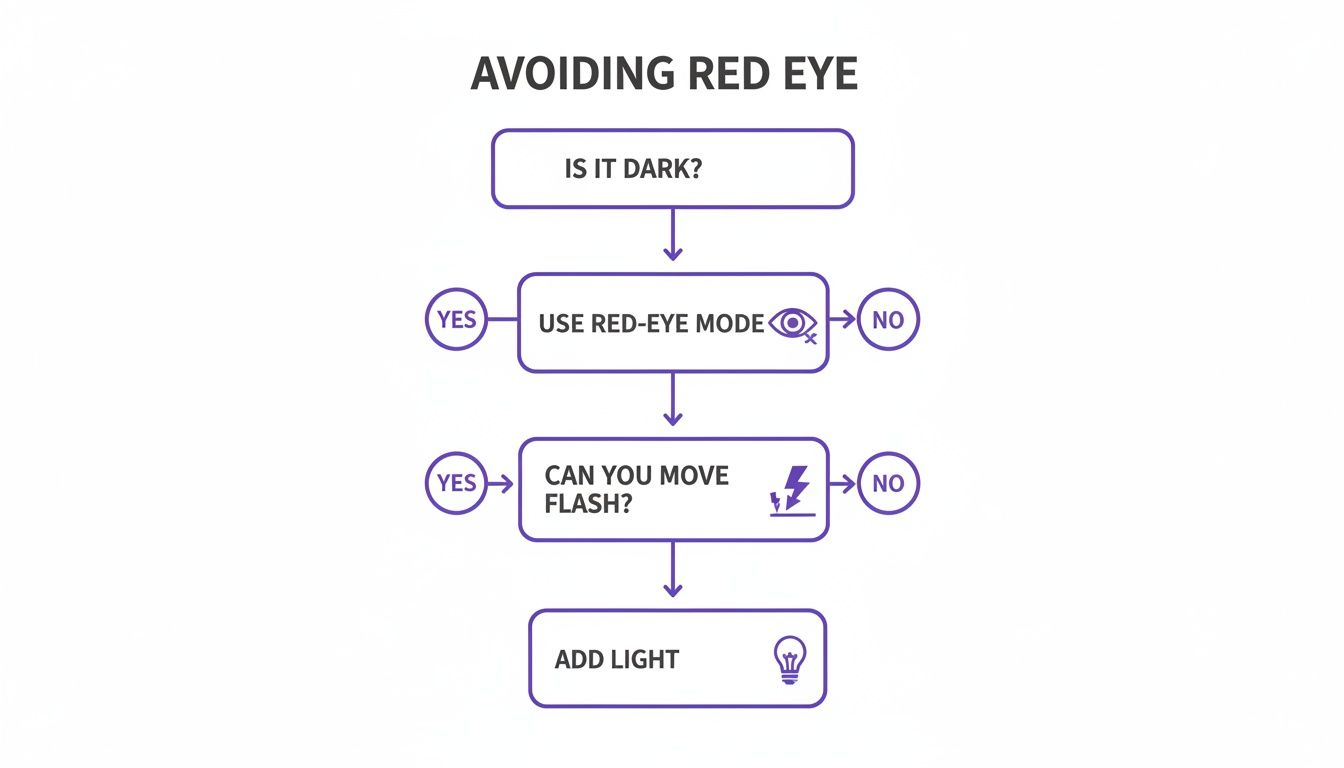
The takeaway is simple: taking a moment to adjust your lighting or use your camera's built-in red-eye reduction can save you a ton of editing headaches later. But when it does happen, knowing which tool to reach for is half the battle.
Using AI Prompts to Remove Red Eye Instantly
Forget manual tweaks and basic one-click fixes. The newest, and frankly coolest, way to remove red eye from photos is to simply tell an AI what you want. Prompt-based editing tools like DreamShootAI have brought professional-level corrections into everyone's hands, no design degree needed. It’s as intuitive as asking a friend to touch up a picture for you.
This is a game-changer for anyone who wants a polished, studio-quality finish without the headache of learning complex software. Maybe you're a newly engaged couple trying to perfect your announcement photos, or a professional updating your headshot. Now you can get flawless results right from home. Just upload your photo and type a simple instruction.
Crafting the Perfect Prompt for Natural Eyes
The real magic is in how you phrase your request. Sure, a simple "fix red eye" will probably do the trick, but you can get much more nuanced results by being a little more specific. The AI understands natural language, so you can guide it to create the exact look you’re picturing.
Here are a few prompts I’ve found work really well:
- For a quick, simple fix: "Correct the red eyes in this portrait."
- To get a more lifelike result: "Make the eyes look natural and remove the red glow."
- If you want to protect the original eye color: "Fix the red pupils but keep the blue iris color."
This kind of intuitive control is exactly why prompt-based editing is becoming so popular. You can see how DreamShootAI’s Photo Edit by prompt feature puts this power at your fingertips.
Ever since photo editing went fully digital after 2000, red-eye removal has been a must-have tool. A recent market analysis confirms its importance: a 2024 consumer survey revealed that 92% of casual photographers found red-eye to be their number one frustration in flash photos. More importantly, correcting it was shown to boost a photo's shareability on platforms like Instagram by 55%.
"An effective AI prompt is just a clear instruction," advises an AI interaction designer. "The more specific you are about what you want—like preserving eye color or even enhancing the catchlights—the better the AI can interpret your creative vision and deliver a result that looks completely natural."
Beyond the Fix: Enhancing Overall Quality
One of the biggest perks of using an all-in-one AI studio is the ability to stack your edits. Once you've removed the red eye, why stop there? You can instantly level up the entire image with a second prompt.
For instance, after your first prompt fixes the eyes, you could follow it up with: "Now, upscale this image to 4K and improve the lighting."
This workflow combines red-eye correction with an AI upscaler, which not only solves the initial problem but also sharpens details, balances the lighting, and boosts the overall resolution. In seconds, you can transform a simple snapshot into a high-definition, professional-grade photograph ready for printing or posting. For those curious about the tech behind these features, articles on AI Development in Flutter offer great insights into how these smart tools are built for modern apps.
Fixing Red Eye on Your Phone with Mobile Apps
Ever taken the perfect group shot on a night out, only to find everyone looks like a demon from a B-movie? It happens. Luckily, you don't need to fire up your computer to fix it. That phone in your pocket is a surprisingly capable editing studio for those quick, on-the-fly corrections you need right before posting.
The demand for powerful mobile editing is huge—the market for photo editing apps was valued at $344.6 million in 2022 and continues to climb, according to Grand View Research. This means there are plenty of high-quality, free apps ready to get the job done in seconds.
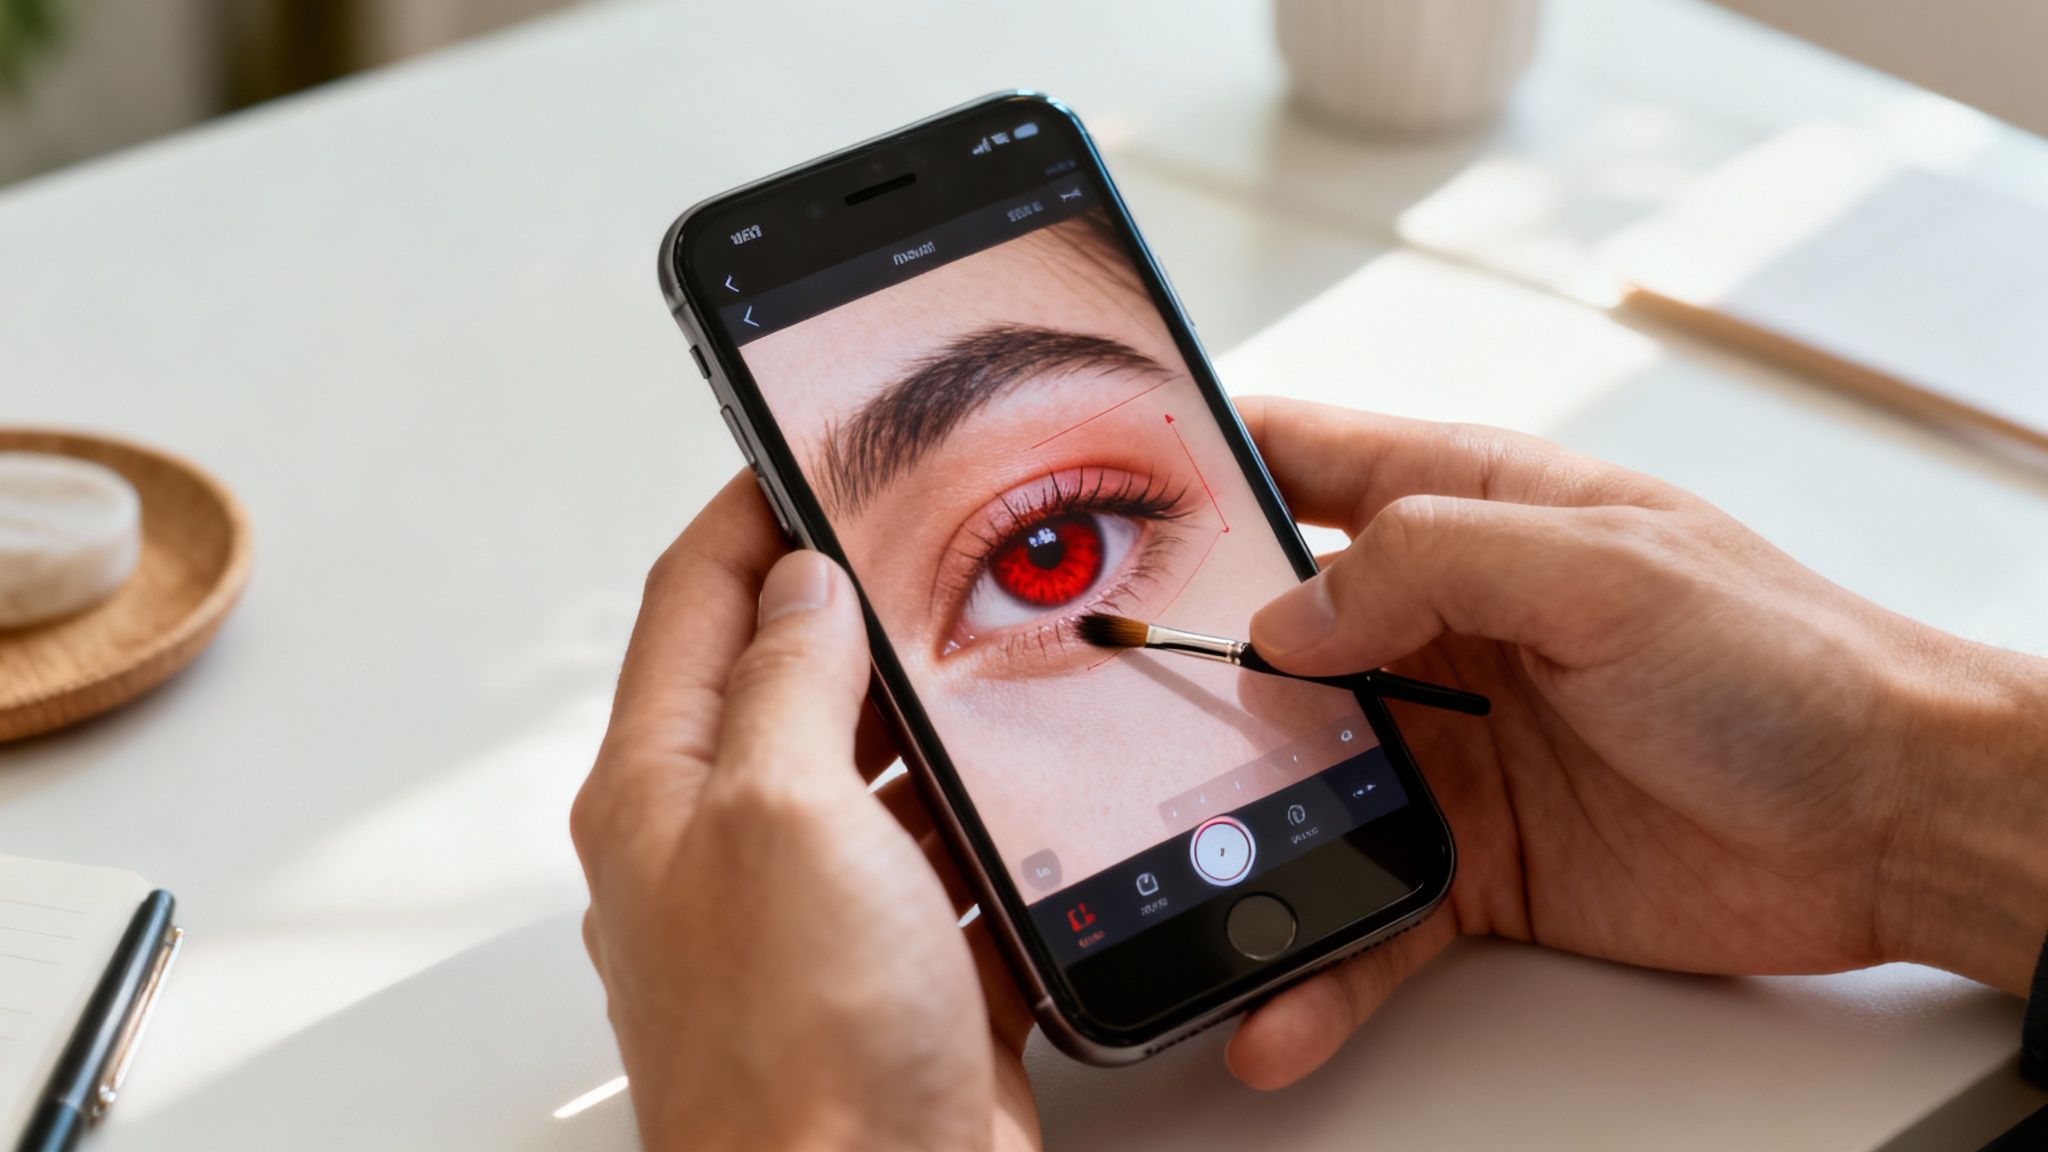
Top Apps for Red Eye Removal
Most of the photo editors you already have installed probably include a dedicated red-eye tool. It’s usually a simple tap-and-fix process, making it perfect for last-minute edits.
Here are a few of the most dependable free apps:
- Apple Photos (iPhone): If you're on an iPhone, the built-in Photos app has you covered. Just tap "Edit," find the icon that looks like an eye with a slash through it, and tap each red pupil. It’s instant and surprisingly effective.
- Google Photos: On both Android and iOS, Google’s editor often flags red eye automatically and suggests a fix. If not, you can usually find the tool under the "Adjust" or "Tools" sections for a one-tap correction.
- Adobe Lightroom Mobile: The free version of this pro-level app has a simple but powerful Red Eye tool. It lets you select the eye, then fine-tune the pupil size and darkness for a much more natural result.
- Snapseed: This is another great editor from Google. While it doesn't have a dedicated red-eye brush, its "Healing" tool works wonders. Just carefully paint over the red pupil, and the app will intelligently blend it with the surrounding area.
If you're looking for more advanced features, it’s worth checking out the best AI photo editing apps which often pack a ton of smart correction tools into one package.
Tips for a Natural Look
Automated tools are fantastic, but sometimes they can be a bit heavy-handed. A sloppy fix can leave pupils looking unnaturally dark or flat, which is just as distracting as the original red eye.
"The goal of red eye correction is invisibility," advises a professional photo retoucher from a major publication. "The best fix is one that nobody notices. This means preserving the natural reflections and texture of the eye, not just painting a black circle over the pupil."
To get a result that looks real, you need to focus on the details. Always zoom in as close as you can. If the app lets you adjust the brush size, make sure it only covers the pupil, not the surrounding iris.
If the first click makes the eye look too dark or "painted on," see if there's a slider to lower the tool's intensity. This creates a softer, more believable correction that blends right in.
Going Beyond the One-Click Fix: Advanced Red Eye Corrections
Let's be honest, those one-click red-eye tools are lifesavers... until they're not. We've all been there: you run the tool, and you're left with a half-fixed glare, weirdly flat black dots for pupils, or that strange green glow in your dog's eyes.
When the automated fix doesn't quite cut it, you have to roll up your sleeves and do a little manual fine-tuning. This is where you can really make an image look professionally retouched.
Bringing Lifeless Pupils Back from the Brink
A common side effect of a lazy red-eye fix is the "painted-on" pupil. It's just a flat, black circle that screams "this was edited." Real pupils have depth and catch the light.
After your initial automated pass in a program like Photoshop, grab the Dodge tool. Set it to a very low exposure, and gently dab a tiny bit of light back into the pupil. This recreates the catchlight—that little sparkle of reflection that makes eyes look alive. It's a small detail that makes a massive difference.
"The biggest mistake is creating a black hole where a pupil should be," cautions a portrait photography specialist. "A real pupil is never pure black; it has subtle tones and reflections. Restoring that detail is the key to an invisible, professional correction."
Another pro trick is to add a hint of color back in. Instead of a harsh, pure black, try painting in a very dark brown or a deep, dark blue. This simple step restores a sense of natural depth that automated tools often strip away. If you're looking for more ways to perfect facial features, learning to erase blemishes using a dedicated app can take your retouching skills to the next level.
Tackling Pet Eyes and Batch Workflows
What about pets? That notorious green or yellow glow in their eyes requires a slightly different approach. Simply desaturating the color often leaves a strange, washed-out gray spot.
Instead, reach for a color replacement tool. Sample a natural, dark color from your pet’s fur or the shadows nearby. Then, carefully paint over the glow with that color. It blends in much more seamlessly than a simple desaturation ever could.
For event and wedding photographers staring down a gallery of hundreds of photos, fixing each one individually is a nightmare. This is where a smart batch workflow comes in. In a program like Adobe Lightroom, you can perfect the red-eye correction on one photo and then sync those exact settings across the entire album. This not only saves hours of tedious work but also ensures a consistent, professional look across all your images. In fact, studies show that photographers can slash their post-production time by 40-60% just by using efficient batch-processing for common problems like red eye.
Got Questions About Fixing Red Eye? We've Got Answers
Even with the best tools in your arsenal, a few questions always pop up when you're trying to remove red eye from photos. Let's tackle the most common ones so you can get every image looking perfect.
Why Do I Still Get Red Eye With Modern Cameras?
It’s frustrating, right? You spend good money on a new camera, and yet, the dreaded red eye still appears. The problem isn't your camera; it's physics. It all comes down to the on-camera flash being too close to the lens, especially when shooting in low light.
This setup causes the flash to shoot straight into the eye, bounce off the blood-rich retina at the back, and reflect right back into the lens. Bam—red eye.
While most cameras have a "red-eye reduction" mode that fires a quick pre-flash to shrink the pupils, it's not a foolproof solution. A study from the American Academy of Ophthalmology confirms the direct angle of light is the real villain here. Your best bet for prevention is to use an external flash or simply turn on a few more lights in the room.
Can AI Tools Really Fix Red Eye In Old Scanned Photos?
You bet they can. AI-powered editors are fantastic for breathing new life into old, scanned photographs. Just digitize that old print from a family album, upload it, and let an AI tool work its magic on the red eye.
"For archival photos, AI is a game-changer," says an archival imaging specialist. "It doesn't just correct red eye; it can restore faded colors and even enhance sharpness, bringing cherished memories back to life with remarkable clarity."
And why stop there? You can give the AI more instructions, like "remove scratches and dust" or "improve overall resolution," to completely transform a worn-out vintage print.
Should I Use A Mobile App Or Desktop Software?
Honestly, it just depends on what you need to get done.
For a quick fix on a photo you're about to post on Instagram, a mobile app like Snapseed or even your phone's built-in editor is perfect. They're convenient, fast, and surprisingly powerful. In fact, Statista reports that mobile photo editing app usage shot up by 35% in 2023, which tells you how popular they are for everyday edits.
But if you're a professional photographer editing a high-resolution wedding album or a huge batch of event photos, you'll want the power and precision of desktop software. A dedicated program like Photoshop, or a robust AI platform, gives you far more control, higher quality output, and workflows built for efficiency.
Ready to banish red eye and create flawless portraits in just a few seconds? DreamShootAI uses powerful, prompt-based AI to fix imperfections while keeping your photos looking natural. Turn your shots into professional-quality images today.
Transform Your Photos with DreamShootAI