Create Indian wedding photos for your wedding album with AI. Cute couple poses, traditional wedding dresses like lehenga, saree, bandhgala and sherwani - all customized to your style.
Upload photos and let AI craft your Indian wedding photos. Cute couple poses, traditional wedding dresses like lehenga, saree, bandhgala and sherwani, and wedding hairstyles - all customized to your style. Professional-grade wedding photos, minus the professional price tag. Save time, money, and look amazing - all without an expensive photographer!
Features:
Wedding Photography
Indian Wedding
Bridal Photos
Wedding Portraits
Wedding Sarees
Wedding Album
AI Wedding
Indian Couple Poses
20 photos included
1,200+ photos generated
Desi Wedding
AI Desi Wedding Photo Generator
Create Desi wedding photos for your wedding album with AI. Cute couple poses, traditional wedding dresses like gharara, saree, bandhgala and sherwani - all customized to your style.
Upload photos and let AI craft your Desi wedding photos. Cute couple poses, traditional wedding dresses like gharara, saree, bandhgala and sherwani, and wedding hairstyles - all customized to your style. Professional-grade wedding photos, minus the professional price tag. Save time, money, and look amazing - all without an expensive photographer!
Features:
Wedding Photography
Indian Wedding
Bridal Photos
Mehndi Photos
Wedding Sarees
Wedding Album
Nikah Photos
Desi Couple Poses
20 photos included
1,200+ photos generated
Valentine's Day
AI Valentine's Day Photo Generator
Create romantic Valentine's Day themed photos. Perfect for cards, social media, or capturing love-filled moments with your special someone.
Transform your photos into a romantic Valentine's Day album. From candlelit dinners to rose-filled scenes, let our AI create the perfect backdrop for your love story. Save time, money, and look amazing - no need for an expensive photographer.
Features:
Valentine's Day
Romantic Photos
Love Letters
Couple Portraits
Romance Photography
Heart Theme
Love Story
Special Moments
40 photos included
1,400+ photos generated
Hairstyle
AI Hairstyle Generator
Try different hairstyles and colors before getting a haircut. Perfect for visualizing your next look or exploring new styles.
Explore endless hair possibilities without the scissors. Upload your photo and let our AI show you how you'd look with any hairstyle or color. Save time, money, and look amazing - no need for an expensive photographer.
Features:
hairstyle ideas
wedding hairstyles
wedding guest hairstyles
hairstyle generator
Hair Design
Beauty Photography
Salon Look
20 photos included
1,600+ photos generated
Professional Headshots
AI Professional Headshot Generator
Transform your selfies into picture-perfect professional headshots in minutes. Upload photos, receive headshots for LinkedIn, CVs, and beyond.
Stand out on LinkedIn and attract more job offers with AI-generated professional headshots. Get up to %180 more job offers from hiring managers. Create an AI model of yourself and generate endless headshots—no need for an expensive photographer. Perfect for LinkedIn, CVs, resumes, and beyond.
Features:
ai headshot generator
ai professional headshot
ai headshots
ai professional headshot generator
Linkedin photos
pfp maker
20 photos included
3,600+ photos generated
Wedding
AI Wedding Photo Generator
Create stunning AI-generated wedding photos. Cute couple poses, stunning wedding dresses and wedding hairstyles - all customized to your style.
Upload photos and let AI craft your perfect day. Cute couple poses, stunning wedding dresses and wedding hairstyles - all customized to your style. Professional-grade wedding photos, minus the professional price tag. Save time, money, and look amazing - no need for an expensive photographer.
Features:
Wedding Photography
Save The Date
Bridal Photos
Wedding Portraits
Wedding Planning
Wedding Album
AI Wedding
Couple Poses
20 photos included
1,200+ photos generated
Nature
AI Nature Photo Generator
Generate outdoor and nature photography with AI.Transform your photos into professional adventure shots with beautiful landscapes and natural backdrops. Perfect for travel content and outdoor enthusiasts.
We'll transform your selfies into a gallery of trekking triumphs and camping memories, set against nature's most stunning backdrops. Save time, money, and look amazing - all without an expensive photographer!
Features:
Nature Photography
Outdoor Portraits
Adventure Photos
Travel Photos
Landscape Photography
Scenic Views
Outdoor Adventure
Wanderlust
20 photos included
800+ photos generated
Mafia
AI Mafia Photo Generator
Channel your inner don or donna with these stylish, vintage-inspired photos. Perfect for themed parties or dramatic social media posts.
Step into the golden age of the mafia with gangster-era portraits. From mafia attire to classic mob style, vintage suits, and timeless sophistication - all without an expensive photographer!
Features:
Vintage Photography
Film Noir
1920s Style
Gatsby Era
Classic Portraits
Dramatic Portraits
Stylized Portraits
Noir Style
20 photos included
950+ photos generated
Cyberpunk
AI Cyberpunk Photo Generator
Dive into the vibrant world of neon-lit cityscapes and cyberpunk aesthetics. Ideal for futuristic themes or eye-catching digital art.
Step into a cyberpunk world with AI-generated futuristic photos! From neon-lit cityscapes to high-tech fashion, create stunning sci-fi portraits and dystopian aesthetics. Experience AI cyberpunk photography like never before—all without an expensive photographer!
Features:
Cyberpunk
Urban Photography
Neon Art
City Lights
Digital Art
Future Fashion
Night Life
Tech Aesthetic
20 photos included
2,200+ photos generated
Holiday 🏖️
AI Holiday Photo Generator
Capture the magic of the holiday season with these festive themed photos. Great for cards, decorations, or spreading holiday joy.
Create stunning holiday photos with AI! From beach vacations to Christmas market strolls, transform your selfies into professional travel photography. Capture honeymoon memories, family holiday pictures, and romantic getaways—all without an expensive photographer!
Features:
Holiday Photos
Christmas Cards
Winter Wonderland
Family Portraits
Seasonal Photography
Holiday Magic
Festive Photos
Season's Greetings
20 photos included
1,500+ photos generated
Engagement
AI Engagement Photo Generator
Celebrate love with these romantic engagement-themed photos. Perfect for announcements, invitations, or capturing special moments.
Turn your selfies into professional engagement photos and romantic pre-wedding pictures in just minutes. DreamShootAI lets you explore couple poses and gorgeous hairstyles. Save time, money, and look amazing - no need for an expensive photographer.
Features:
Engagement Photos
Proposal Pictures
Couple Portraits
pre-wedding photos
Ring Photos
save the date
Romance Photos
Perfect Proposal
20 photos included
1,100+ photos generated
Boudoir
AI Boudoir Photo Generator
Create tasteful and artistic couple boudoir photos. Ideal for private collections or exploring intimate photography.
Experience the art of erotic photography and a sexy photo shoot from the privacy of your home. Try AI lingerie and explore stunning looks—no need for an expensive photographer. Save time, money, and look amazing - no need for an expensive photographer.
Features:
Boudoir Photography
Intimate Portraits
Couple Photos
Artistic Photography
Romantic Pictures
Anniversary Photos
Private Session
Sensual Photography
20 photos included
750+ photos generated
Gala Photos
AI Gala Photo Generator
Generate sophisticated high-class party scenes. Perfect for event planning, invitations, or visualizing elegant gatherings.
From designer gowns and to elegant tuxedos. Upload photos and our AI creates stunning, paparazzi-worthy shots of you two owning the night at the most exclusive galas and balls. Save time, money, and look amazing - no need for an expensive photographer.
Features:
Gala Photos
Luxury Events
Red Carpet
Black Tie
Fashion Photography
Formal Events
High Society
Glamour Shots
20 photos included
1,300+ photos generated
Christmas Couple
AI Christmas Couple Photo Generator
Create magical Christmas couple photos with AI. Romantic moments under the mistletoe, cozy fireplace scenes, snowy winter wonderland portraits perfect for holiday cards.
Make this holiday season unforgettable with DreamShootAI, the premier AI Christmas photo generator for couples and families. Whether you are looking for romantic Christmas couple pictures under the mistletoe or personalized AI holiday photos for your digital cards, our advanced models deliver studio-quality results in seconds. Generate your custom AI Christmas album today and capture the magic of the season with just a few clicks.
Features:
Christmas Photos
Couple Photos
Holiday Cards
Romantic Christmas
Winter Wonderland
Mistletoe Photos
Christmas Portraits
Festive Couple
40 photos included
850+ photos generated
Christmas Photos
AI Christmas Photo Generator
Generate stunning AI Christmas photos with Santa outfits, winter scenes, festive backgrounds and holiday magic. Perfect for cards, gifts, and social media.
DreamShootAI, Worlds's best AI Christmas photo generator. Skip the expensive studio and create realistic AI Christmas photos from the comfort of your home. Whether you are looking for a whimsical AI Christmas portrait in a snowy wonderland, or personalized AI holiday photos for your digital cards, generate your custom AI Christmas album today and capture the magic of the season with just a few clicks.
Features:
Christmas Photos
Holiday Photos
Santa Photos
Winter Photos
Christmas Cards
Festive Photos
AI Christmas
Holiday Magic
40 photos included
1,200+ photos generated
November 2, 2025
How to Take Professional Photos at Home
Learn how to take professional photos at home with this complete guide. Master your camera, lighting, and composition to create stunning, studio-quality images.
If you want to take professional-looking photos at home, you really only need to get a handle on three things: your space, your camera settings, and light. It’s amazing what you can pull off with a basic camera or even just your phone once you learn how to create a clean background, take control of your manual settings, and work with the light you have.
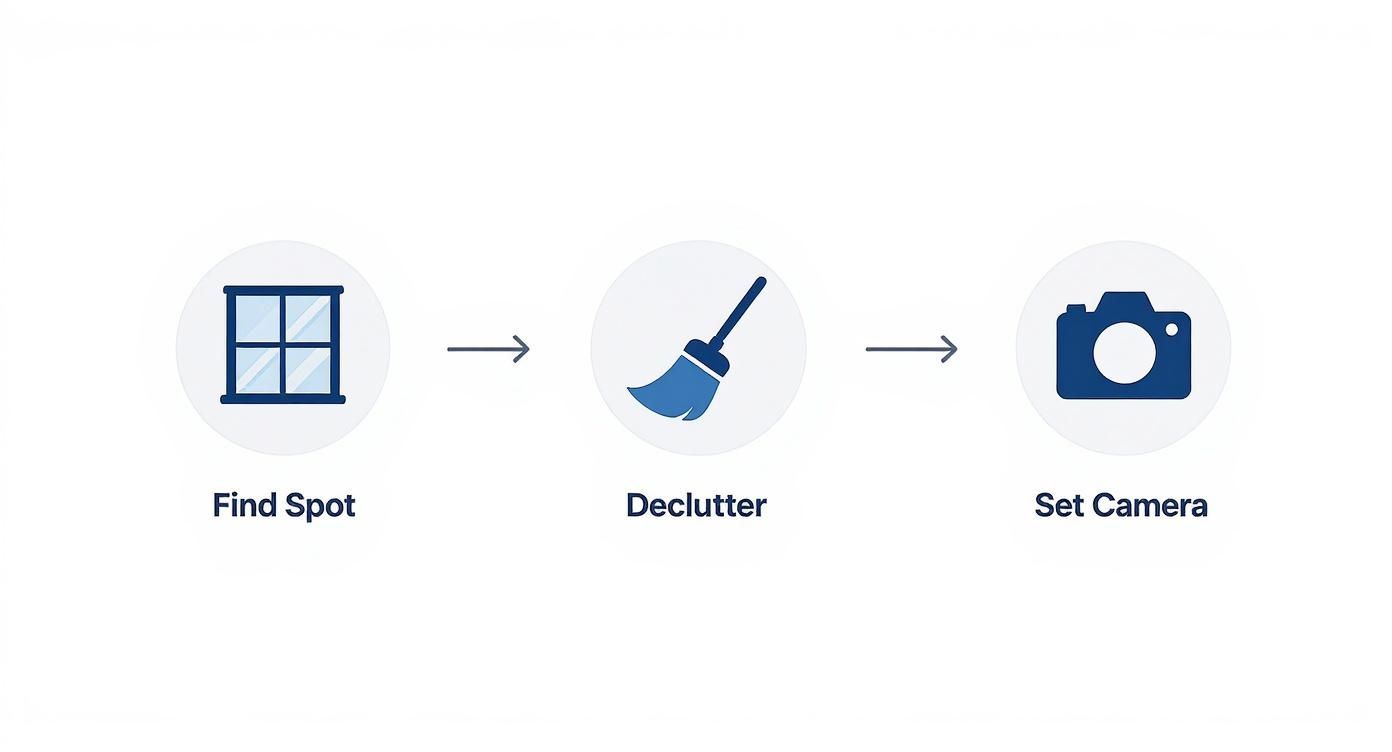
This is how you turn any old room into a functional photo studio.
Building Your At-Home Photo Studio
The term "photo studio" sounds way more intimidating than it is. For our purposes, it’s just a space where you’re in complete control of the environment. The main goal here is to get rid of any and all distractions so your subject—whether that’s a person, a product, or a plate of food—is the absolute star of the show.
This control is paramount in a world dominated by visuals. According to a study by Justuno, an astonishing 93% of consumers consider visual appearance to be the key deciding factor in their purchasing decisions. That statistic alone proves the power of a clean, professional-looking image, even if you’re just shooting for a personal project.
And the best part? You don't need a huge budget to make this happen. It all starts with finding the right spot and prepping it for the shoot.
Find Your Light and Space
First things first: scout your home for the best possible light. More often than not, this is going to be a large window. But not all window light is created equal.
You're looking for a room that gets bright, indirect sunlight. This kind of light creates soft, flattering shadows that are much easier to work with than the harsh, direct sun you’d get in the middle of the day.
Once you’ve found your spot, it's time to declutter. I mean, ruthlessly. Get rid of anything that doesn't absolutely need to be in the photo—stray mail on the counter, charging cords snaking across the floor, that random chair in the corner. You want a neutral backdrop that won’t steal the spotlight.
As celebrated photographer Annie Leibovitz famously stated, "A thing that you see in my pictures is that I was not afraid to fall in love with these people." While she speaks of connection, the underlying principle is focus. A cluttered environment distracts from the subject you're meant to connect with.
For some next-level ideas on making a space look its best, checking out some professional real estate staging tips can be a huge help. They’re masters at arranging rooms for maximum visual punch.
Master Manual Camera Settings
Flipping that dial on your camera from "Auto" to "Manual" is probably the single biggest leap you can take in your photography. It gives you direct control over the holy trinity of exposure: aperture, ISO, and shutter speed.
If you're trying to build a professional presence online, getting a feel for these settings is a must. A great benchmark for the quality you should be aiming for is learning how to take an AI professional headshot at https://dreamshootai.com/headshot.
To get you started, I've put together a quick cheat sheet for some of the most common lighting situations you'll run into at home.
Quick Reference Camera Settings for Home Photography
This little guide should give you a solid starting point for dialing in your camera settings based on the light you have available. Remember, these are just recommendations—the best way to learn is to experiment!
Lighting Condition
Recommended Aperture
Recommended ISO
Recommended Shutter Speed
Bright, Indirect Window Light
f/2.8 - f/5.6
100 - 400
1/125s or faster
Overcast Day (Soft Light)
f/1.8 - f/4.0
200 - 800
1/100s or faster
Standard Indoor Room Light
f/1.8 - f/2.8
800 - 1600
1/80s or faster
Low Light (Artistic Mood)
f/1.4 - f/2.8
1600 - 3200
1/60s (use a tripod!)
Don't be afraid to play around with these numbers. If your image is too dark, try a wider aperture (smaller f-number) or a higher ISO. If it's too bright, do the opposite. You'll get the hang of it faster than you think.
Mastering Light Without Expensive Gear
Light is everything in photography. It’s the one ingredient that can make or break your shot. The legendary Ansel Adams put it best: "You don't take a photograph, you make it." And the secret to making a great photograph almost always comes down to how you shape and control light—no Hollywood budget required.
Learning how to take professional photos at home isn't just about finding the nearest window. It's about becoming a light sculptor, using whatever you have on hand to create the perfect mood and stunning clarity in your images.
Sculpting Natural Light on a Budget
Your most powerful lighting tool is completely free: a large window with bright, indirect sunlight. You want to avoid harsh, direct sun at all costs, as it creates unflattering, hard-edged shadows. The soft, gentle light from an overcast day or a north-facing window is what you’re looking for—it wraps around your subject beautifully.
Once you’ve found your light source, the real magic begins when you start to control it. You can easily do this with a few common household items:
DIY Reflector: Grab a simple piece of white poster board or foam core. This is a total game-changer. Position it opposite your window to bounce soft light back onto your subject, instantly filling in any distracting shadows on their face or your product.
DIY Diffuser: If the sun is a bit too intense, just hang a thin, plain white bedsheet over the window. This instantly turns your window into a giant softbox, scattering the light and creating a gentle, even glow that’s incredibly flattering for portraits.
If you really want to get serious about mastering light, it pays to optimize the natural light sources you already have in your home. You can find some fantastic tips on increasing natural light in your house that show how simple changes to windows and decor can make a huge difference.
“Good light will make more of an impact on your photos than anything else. You can have the best camera in the world but if you have crappy lighting your photos will be blown away by a camera phone and good light.” – Melissa Arlena, Professional Newborn Photographer
This is the key takeaway. A well-lit smartphone photo will always, always look better than a poorly lit shot from a high-end DSLR. It’s not about the gear; it’s about the light.
The infographic below breaks down a simple workflow for setting up your home studio space to make the most of that beautiful natural light.
As you can see, finding the right light and prepping your space are the first things you should do, long before you even pick up your camera.
Affordable Artificial Lighting Options
What about when natural light just isn't cutting it? You still don’t need to drop a fortune on a complex, multi-light studio setup. A single, well-placed artificial light can elevate your photos in a huge way.
For portraits and headshots, a ring light is a super popular and affordable choice. It creates a distinctive, nearly shadowless look that you see all over social media. But if you want more versatility for product shots or creative portraits, a single LED panel with a softbox is a much better investment. It gives you directional light, which helps create depth and dimension that a ring light simply can't.
Don't underestimate the power of good lighting. It has a real, measurable impact. In real estate, a study cited by the Wall Street Journal found that professional photography can help a home sell faster and for several thousand dollars more. That's a direct financial link between image quality and perceived value—a principle that holds true whether you’re selling a house, a product, or your personal brand.
Composing Your Shot to Tell a Story
Let's be real: a technically perfect photo with flawless lighting can still fall completely flat. If it doesn't have a strong composition, it just feels... empty. This is where you graduate from being a camera operator to a visual artist. Good composition is all about intentionally guiding your viewer's eye, creating balance, and turning a simple snapshot into a story.
Arranging the elements inside the frame is how you decide what the photo is truly about. By learning just a few timeless principles, you can start creating images that feel both dynamic and deliberate, even if you're just figuring out how to take professional photos at home.
Applying Classic Rules in a Home Setting
You don't need some sweeping, dramatic landscape to use powerful compositional tricks. Your home is already packed with lines, frames, and textures you can use to give your shot some structure.
A great place to start is the Rule of Thirds. Just imagine your screen has a 3x3 grid overlaid on it. Instead of sticking your subject right in the dead center, try placing them along one of the lines or where two lines intersect. It's a simple shift, but it instantly makes the image feel more balanced and interesting.
Keep an eye out for other natural elements that can boost your composition:
Leading Lines: Use the edge of a dining table, the lines of a hardwood floor, or the gentle curve of a staircase to draw the viewer’s eye right toward your subject.
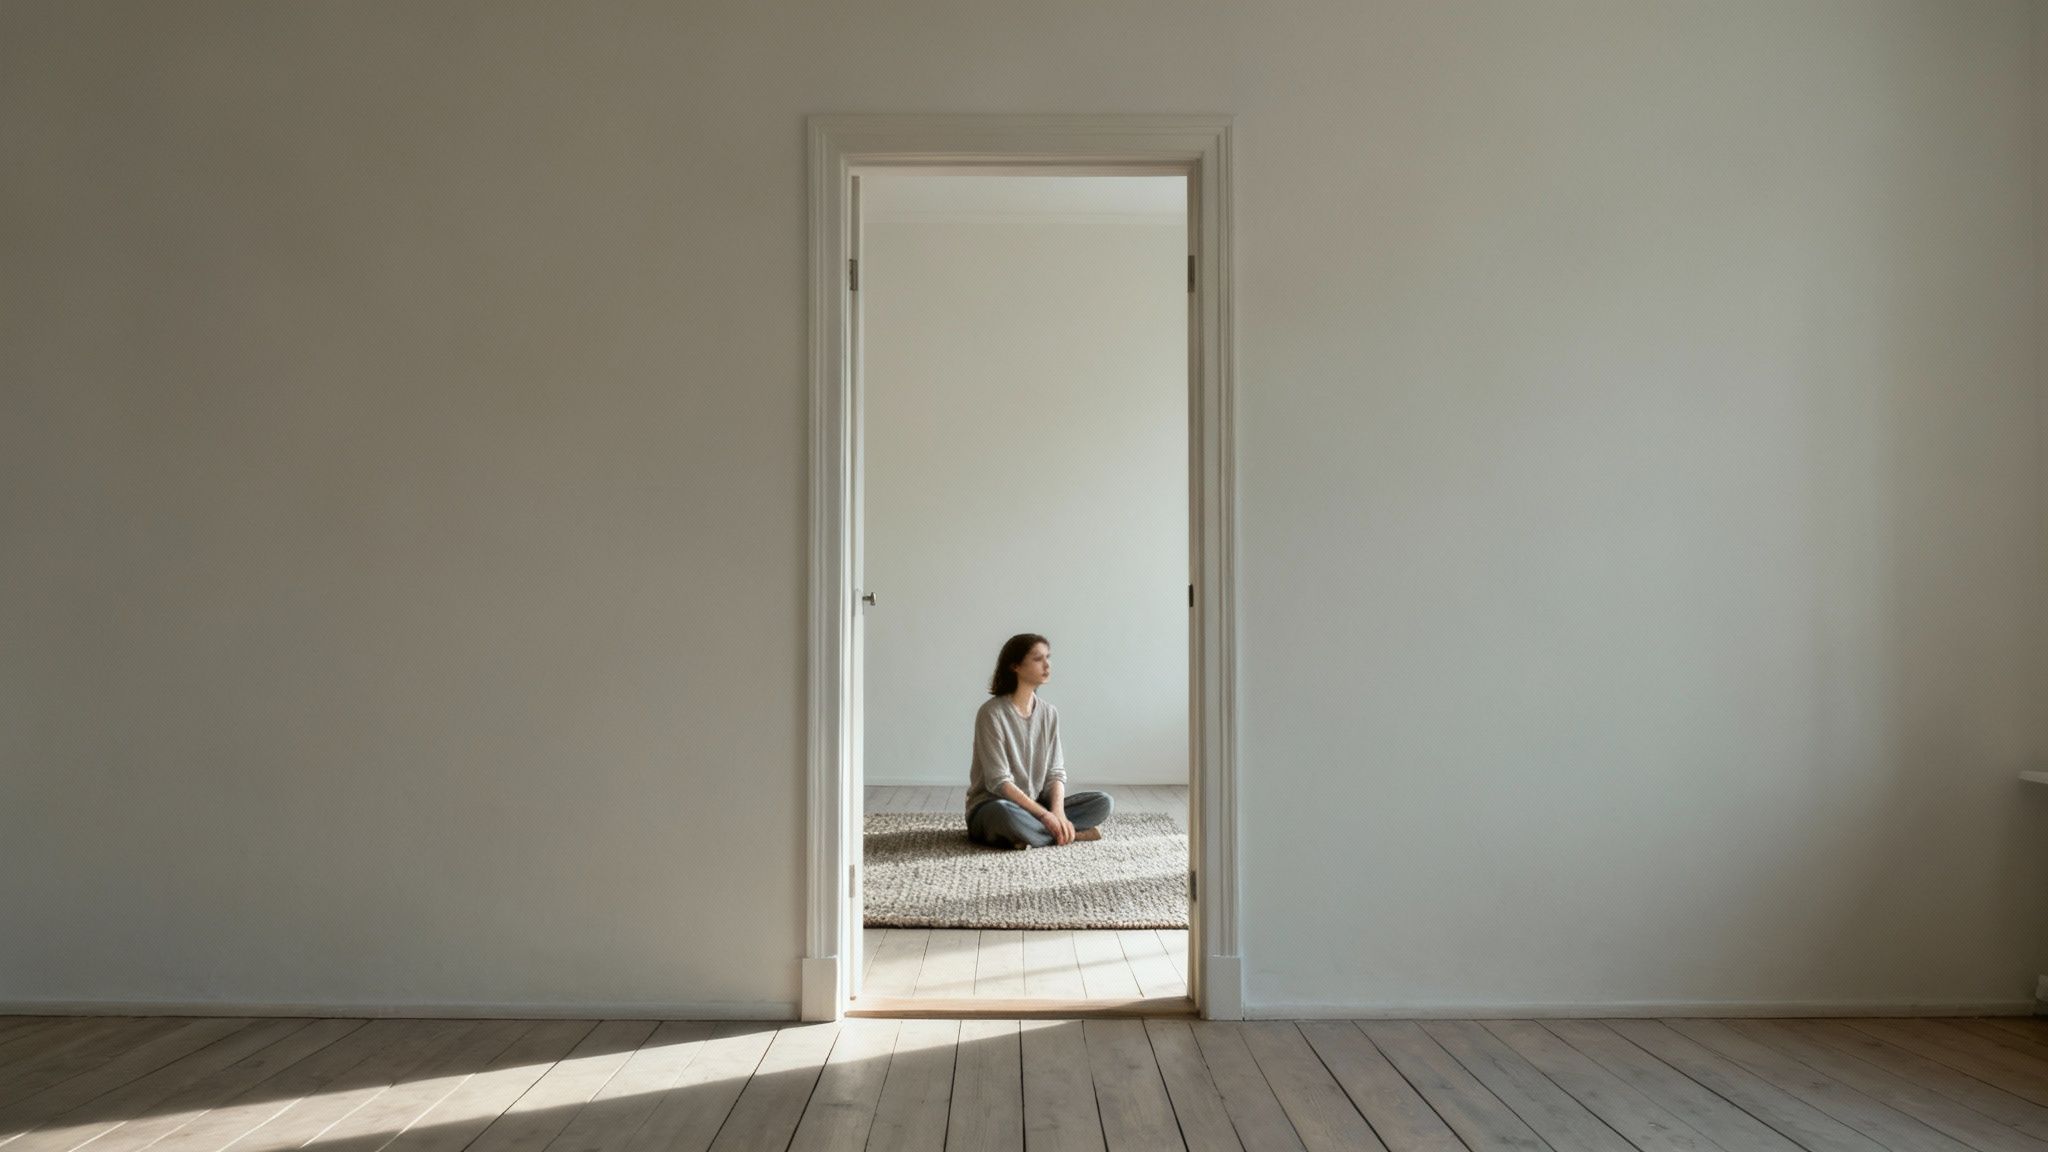
Framing: A doorway, a window, or even the space between two chairs can act as a natural frame within your photo. This adds a fantastic sense of depth and really focuses the viewer's attention.
Before you even press the shutter, it helps to have a little plan. Thinking through your visual narrative beforehand is key. You can even use an AI storyboard generator to help map out your compositions and make sure every photo works together to tell a cohesive story.
"A good photograph is one that communicates a fact, touches the heart and leaves the viewer a changed person for having seen it. It is, in a word, effective." – Irving Penn, Legendary Photographer
Penn's insight is spot-on. Your compositional choices—your visual "style"—are a huge part of building a personal or professional brand with your images.
The Power of Perspective
The angle you shoot from can completely change the mood and message of your photo. Don't just stand there and shoot everything from eye level! Getting creative with your camera's position is one of the easiest ways to give your shots a professional flair.
Try shooting from a slightly lower angle. It can make a person—or even a product—feel more confident and heroic. On the flip side, a higher, bird's-eye-view angle can create a feeling of intimacy or offer a unique, stylized look.
The impact of high-quality, thoughtfully composed images is undeniable. Take real estate, for example. A Zillow analysis found that listings with professional photos sell 32% faster, spending an average of 31 fewer days on the market. It's proof that how you present something directly influences its perceived value and appeal.
Posing and Directing for Natural Portraits
Let's be honest, photographing people can be the most nerve-wracking part of learning how to take professional photos at home. Nailing the technical side of a shot is one thing, but capturing someone's actual personality? That’s a whole different ballgame.
The secret isn’t about memorizing a hundred stiff, awkward poses. It's about creating a genuine connection that helps your subject feel completely at ease—even confident—in front of your camera.
Forget everything you think you know about posing. We're focusing on tiny, natural adjustments that make a massive difference. For instance, just have your subject shift their weight onto one leg. This small change creates a subtle S-curve in their body, which immediately looks more dynamic and relaxed. Angling their shoulders slightly away from the camera is another trick that's universally flattering.
Hands are usually the first thing to look awkward. So, give them a job to do. Ask your subject to gently touch their hair, rest a hand on a nearby chair, or even just hold a prop like a coffee mug. These little actions make the entire pose feel more authentic and way less staged.
Prompting Authentic Expressions
If there's one phrase you need to banish from your vocabulary, it's "say cheese." It’s the sworn enemy of natural portraits and guarantees a forced, fake smile every single time. Instead, you want to use conversational prompts that bring out real emotions. This is where you shift from a photographer to a director.
Instead of just barking commands, try a more conversational approach:
Ask a question: "Think about your absolute favorite vacation. What did it smell like there?" This simple question usually brings out a calm, reflective expression.
Create a scenario: "Imagine you just bumped into your best friend who you haven't seen in a year." You'll get a real, joyful smile, not a forced one.
Use humor: A goofy joke or a funny observation can instantly break the tension, leading to genuine laughter—something that always looks incredible on camera.
This focus on real interaction is what elevates a simple picture into a powerful portrait.
"Connection is the key. Without it, you just have a picture of a human. With it, you have a portrait of a soul." – Sue Bryce, Renowned Portrait Photographer
That quote from Sue Bryce really hits home. The ultimate goal here is to capture who a person is, not just a sterile image of what they look like.
Using Your Environment
Your own home is secretly filled with amazing posing aids—you just have to know where to look. A windowsill is a perfect spot for someone to lean, creating soft, gorgeous light across their face.
Have your subject sit backward on a dining chair and rest their arms on the back; it's a simple way to create a strong, confident pose. Even just leaning against a doorway can give off a casual, relaxed vibe. The idea is to make the person part of their environment, so the final image feels less like a photoshoot and more like a snapshot of a real moment.
Editing and Polishing Your Final Images
That click of the shutter? That’s just the start. The real magic, where a good photo becomes a great one, happens in post-processing. This is where you fine-tune the details and bake in that signature style that makes your work instantly recognizable. Think of editing not as faking reality, but enhancing it—making sure your final image is sharp, vibrant, and intentional.
This final step is your chance to correct minor hiccups and make the colors truly sing. I know a lot of people just learning how to take professional photos at home get intimidated by editing software, but today’s tools are more intuitive than ever. The goal is a simple, non-destructive workflow that elevates what you’ve already captured.
The Foundation of a Great Edit
Before you even think about fancy filters or complex techniques, every professional edit begins with the basics. These fundamental adjustments are the bedrock of your image and should always be your first stop, whether you're in Adobe Lightroom or just using a free app on your phone.
Get these foundational tweaks right first:
Exposure: This is simply the overall brightness. Nudge the slider to make sure your photo isn’t too dark (underexposed) or blown out (overexposed).
Contrast: This is all about the difference between the darkest darks and brightest whites. Cranking it up adds punch and drama, while pulling it back creates a softer, more muted vibe.
White Balance: Getting the white balance right ensures your colors are true to life. If your photo has a funky yellow or blue cast from your home’s lighting, this is the tool that’ll fix it.
Once you’ve got these dialed in, you have a solid, well-balanced canvas to build upon.
Refining and Retouching for a Polished Look
With the basics handled, it's time to zoom in on the finer details that give your photos that professional polish. This is where you can zap away small distractions and guide the viewer’s eye right where you want it to go. For portraits, this might mean a little subtle skin smoothing or gently brightening the eyes to make them pop.
For product or interior shots, the game is all about cleanliness and clarity. You might use a spot removal tool to erase a scuff mark on the wall or a stray crumb on a plate. The idea is simple: get rid of anything that pulls attention away from your subject.
"The aim of a good edit is not to create a new image, but to bring out the very best version of the one you captured. It's the final coat of polish that makes all the difference." – Unattributed Photo Editor's Maxim
Many of these once-advanced editing tasks are becoming way easier thanks to new tech. If you need to fix tricky lighting or sharpen details in a hurry, an AI-powered photo enhancer can analyze your image and apply ideal corrections with just one click. It's a huge time-saver that delivers studio-quality results without the steep learning curve.
The impact of high-quality, edited images is massive across different fields. A study from Adobe revealed that posts with professional-quality photos see 650% higher engagement than those with stock imagery or amateur shots. This data underscores how powerful, well-edited imagery transforms viewer interaction, a principle that applies from social media to e-commerce.
Your Top At-Home Photography Questions, Answered
Jumping into at-home photography always kicks up the same handful of questions. It doesn't matter if you're a total beginner or just new to shooting in your own space—some challenges are universal. Let's tackle the big ones so you can stop wondering and start seeing a real difference in your photos.
Do I Really Need a Super Expensive Camera?
Nope. Absolutely not. While a fancy DSLR or mirrorless camera gives you more buttons to press and dials to turn, the smartphone in your pocket is a powerhouse. The real magic isn't in the gear's price tag; it's in how you see and shape light.
Think about it this way: real estate listings shot with a DSLR can boost a home's sale price by $3,000 to $11,000, according to research cited by Forbes. But that's because the photographer understood the fundamentals. A well-lit, beautifully composed photo from an iPhone will always look better than a sloppy, poorly lit shot from a top-of-the-line camera.
Get comfortable with what you have first. Switch your phone to "Pro" or "Manual" mode and start playing with the settings. Master the craft, then worry about the gear.
How Do I Get That Professional Blurry Background?
That gorgeous, soft-focus background you see in professional portraits has a name: bokeh. It’s the secret sauce that makes your subject stand out, and it’s way easier to achieve than you think. It's all about creating a shallow depth of field.
Here are the three main ways to pull it off:
Open up your aperture. This is the opening in your lens. Set it to the lowest f-stop number you can (like f/1.8 or f/2.8) to let the most light in and create the most blur.
Create some distance. The further your subject is from the background, the blurrier that background will become. Pull them away from that wall!
Move closer. Physically moving your camera closer to the person or object you're shooting also compresses the background and dials up the blur.
Don't have a dedicated camera? No sweat. Most modern smartphones have a "Portrait Mode" that uses software to mimic this effect, and honestly, the results are pretty darn convincing.
What’s the Best Lighting Setup on a Budget?
The best, and by far the cheapest, lighting setup is one you already own: a big window on a cloudy day. That’s it. You get a massive source of beautiful, soft, diffused light, and it costs you nothing.
Want to take it one step further? Grab a piece of white foam board from a craft store and place it opposite the window, just out of frame. It acts as a perfect reflector, gently bouncing light back to fill in any harsh shadows on your subject. This simple trick alone will make your photos look instantly more professional.
If you're ready to buy some gear, skip the ring light and start with a single LED panel and a softbox. It's a versatile and affordable combo that gives you way more creative freedom.
"Good light will make more of an impact on your photos than anything else...a camera phone and good light" will beat a professional camera with poor lighting every time. – Melissa Arlena, Professional Newborn Photographer
Why Do My Photos Have a Weird Yellow or Blue Tint?
If your colors look "off," you've got a white balance issue. Every light source has a different color temperature—the light from a lamp in your living room is warm and yellow, while the light in the shade on a sunny day is cool and blue. Your camera's Auto White Balance (AWB) tries its best to correct for this, but it often gets confused indoors.
To get clean, accurate colors, you need to tell your camera what kind of light you're in. Look for the white balance settings and manually choose the right one, like "Tungsten" for indoor bulbs or "Daylight."
For the ultimate control, shoot in RAW format. This captures all the raw data from the camera's sensor, letting you perfectly adjust the white balance later in editing without losing any image quality.
Ready to skip the setup and jump straight to stunning, professional-quality images? DreamShootAI uses AI to transform your simple selfies into breathtaking photoshoots. Create polished headshots, romantic couple portraits, and dynamic social media content from the comfort of your home. Discover how easy it is to create your dream shoot today at DreamShootAI.
home photographyprofessional photos at homeDIY photographylighting techniquesportrait photography