Create Indian wedding photos for your wedding album with AI. Cute couple poses, traditional wedding dresses like lehenga, saree, bandhgala and sherwani - all customized to your style.
Upload photos and let AI craft your Indian wedding photos. Cute couple poses, traditional wedding dresses like lehenga, saree, bandhgala and sherwani, and wedding hairstyles - all customized to your style. Professional-grade wedding photos, minus the professional price tag. Save time, money, and look amazing - all without an expensive photographer!
Features:
Wedding Photography
Indian Wedding
Bridal Photos
Wedding Portraits
Wedding Sarees
Wedding Album
AI Wedding
Indian Couple Poses
20 photos included
1,200+ photos generated
Desi Wedding
AI Desi Wedding Photo Generator
Create Desi wedding photos for your wedding album with AI. Cute couple poses, traditional wedding dresses like gharara, saree, bandhgala and sherwani - all customized to your style.
Upload photos and let AI craft your Desi wedding photos. Cute couple poses, traditional wedding dresses like gharara, saree, bandhgala and sherwani, and wedding hairstyles - all customized to your style. Professional-grade wedding photos, minus the professional price tag. Save time, money, and look amazing - all without an expensive photographer!
Features:
Wedding Photography
Indian Wedding
Bridal Photos
Mehndi Photos
Wedding Sarees
Wedding Album
Nikah Photos
Desi Couple Poses
20 photos included
1,200+ photos generated
Valentine's Day
AI Valentine's Day Photo Generator
Create romantic Valentine's Day themed photos. Perfect for cards, social media, or capturing love-filled moments with your special someone.
Transform your photos into a romantic Valentine's Day album. From candlelit dinners to rose-filled scenes, let our AI create the perfect backdrop for your love story. Save time, money, and look amazing - no need for an expensive photographer.
Features:
Valentine's Day
Romantic Photos
Love Letters
Couple Portraits
Romance Photography
Heart Theme
Love Story
Special Moments
40 photos included
1,400+ photos generated
Hairstyle
AI Hairstyle Generator
Try different hairstyles and colors before getting a haircut. Perfect for visualizing your next look or exploring new styles.
Explore endless hair possibilities without the scissors. Upload your photo and let our AI show you how you'd look with any hairstyle or color. Save time, money, and look amazing - no need for an expensive photographer.
Features:
hairstyle ideas
wedding hairstyles
wedding guest hairstyles
hairstyle generator
Hair Design
Beauty Photography
Salon Look
20 photos included
1,600+ photos generated
Professional Headshots
AI Professional Headshot Generator
Transform your selfies into picture-perfect professional headshots in minutes. Upload photos, receive headshots for LinkedIn, CVs, and beyond.
Stand out on LinkedIn and attract more job offers with AI-generated professional headshots. Get up to %180 more job offers from hiring managers. Create an AI model of yourself and generate endless headshots—no need for an expensive photographer. Perfect for LinkedIn, CVs, resumes, and beyond.
Features:
ai headshot generator
ai professional headshot
ai headshots
ai professional headshot generator
Linkedin photos
pfp maker
20 photos included
3,600+ photos generated
Wedding
AI Wedding Photo Generator
Create stunning AI-generated wedding photos. Cute couple poses, stunning wedding dresses and wedding hairstyles - all customized to your style.
Upload photos and let AI craft your perfect day. Cute couple poses, stunning wedding dresses and wedding hairstyles - all customized to your style. Professional-grade wedding photos, minus the professional price tag. Save time, money, and look amazing - no need for an expensive photographer.
Features:
Wedding Photography
Save The Date
Bridal Photos
Wedding Portraits
Wedding Planning
Wedding Album
AI Wedding
Couple Poses
20 photos included
1,200+ photos generated
Nature
AI Nature Photo Generator
Generate outdoor and nature photography with AI.Transform your photos into professional adventure shots with beautiful landscapes and natural backdrops. Perfect for travel content and outdoor enthusiasts.
We'll transform your selfies into a gallery of trekking triumphs and camping memories, set against nature's most stunning backdrops. Save time, money, and look amazing - all without an expensive photographer!
Features:
Nature Photography
Outdoor Portraits
Adventure Photos
Travel Photos
Landscape Photography
Scenic Views
Outdoor Adventure
Wanderlust
20 photos included
800+ photos generated
Mafia
AI Mafia Photo Generator
Channel your inner don or donna with these stylish, vintage-inspired photos. Perfect for themed parties or dramatic social media posts.
Step into the golden age of the mafia with gangster-era portraits. From mafia attire to classic mob style, vintage suits, and timeless sophistication - all without an expensive photographer!
Features:
Vintage Photography
Film Noir
1920s Style
Gatsby Era
Classic Portraits
Dramatic Portraits
Stylized Portraits
Noir Style
20 photos included
950+ photos generated
Cyberpunk
AI Cyberpunk Photo Generator
Dive into the vibrant world of neon-lit cityscapes and cyberpunk aesthetics. Ideal for futuristic themes or eye-catching digital art.
Step into a cyberpunk world with AI-generated futuristic photos! From neon-lit cityscapes to high-tech fashion, create stunning sci-fi portraits and dystopian aesthetics. Experience AI cyberpunk photography like never before—all without an expensive photographer!
Features:
Cyberpunk
Urban Photography
Neon Art
City Lights
Digital Art
Future Fashion
Night Life
Tech Aesthetic
20 photos included
2,200+ photos generated
Holiday 🏖️
AI Holiday Photo Generator
Capture the magic of the holiday season with these festive themed photos. Great for cards, decorations, or spreading holiday joy.
Create stunning holiday photos with AI! From beach vacations to Christmas market strolls, transform your selfies into professional travel photography. Capture honeymoon memories, family holiday pictures, and romantic getaways—all without an expensive photographer!
Features:
Holiday Photos
Christmas Cards
Winter Wonderland
Family Portraits
Seasonal Photography
Holiday Magic
Festive Photos
Season's Greetings
20 photos included
1,500+ photos generated
Engagement
AI Engagement Photo Generator
Celebrate love with these romantic engagement-themed photos. Perfect for announcements, invitations, or capturing special moments.
Turn your selfies into professional engagement photos and romantic pre-wedding pictures in just minutes. DreamShootAI lets you explore couple poses and gorgeous hairstyles. Save time, money, and look amazing - no need for an expensive photographer.
Features:
Engagement Photos
Proposal Pictures
Couple Portraits
pre-wedding photos
Ring Photos
save the date
Romance Photos
Perfect Proposal
20 photos included
1,100+ photos generated
Boudoir
AI Boudoir Photo Generator
Create tasteful and artistic couple boudoir photos. Ideal for private collections or exploring intimate photography.
Experience the art of erotic photography and a sexy photo shoot from the privacy of your home. Try AI lingerie and explore stunning looks—no need for an expensive photographer. Save time, money, and look amazing - no need for an expensive photographer.
Features:
Boudoir Photography
Intimate Portraits
Couple Photos
Artistic Photography
Romantic Pictures
Anniversary Photos
Private Session
Sensual Photography
20 photos included
750+ photos generated
Gala Photos
AI Gala Photo Generator
Generate sophisticated high-class party scenes. Perfect for event planning, invitations, or visualizing elegant gatherings.
From designer gowns and to elegant tuxedos. Upload photos and our AI creates stunning, paparazzi-worthy shots of you two owning the night at the most exclusive galas and balls. Save time, money, and look amazing - no need for an expensive photographer.
Features:
Gala Photos
Luxury Events
Red Carpet
Black Tie
Fashion Photography
Formal Events
High Society
Glamour Shots
20 photos included
1,300+ photos generated
Christmas Couple
AI Christmas Couple Photo Generator
Create magical Christmas couple photos with AI. Romantic moments under the mistletoe, cozy fireplace scenes, snowy winter wonderland portraits perfect for holiday cards.
Make this holiday season unforgettable with DreamShootAI, the premier AI Christmas photo generator for couples and families. Whether you are looking for romantic Christmas couple pictures under the mistletoe or personalized AI holiday photos for your digital cards, our advanced models deliver studio-quality results in seconds. Generate your custom AI Christmas album today and capture the magic of the season with just a few clicks.
Features:
Christmas Photos
Couple Photos
Holiday Cards
Romantic Christmas
Winter Wonderland
Mistletoe Photos
Christmas Portraits
Festive Couple
40 photos included
850+ photos generated
Christmas Photos
AI Christmas Photo Generator
Generate stunning AI Christmas photos with Santa outfits, winter scenes, festive backgrounds and holiday magic. Perfect for cards, gifts, and social media.
DreamShootAI, Worlds's best AI Christmas photo generator. Skip the expensive studio and create realistic AI Christmas photos from the comfort of your home. Whether you are looking for a whimsical AI Christmas portrait in a snowy wonderland, or personalized AI holiday photos for your digital cards, generate your custom AI Christmas album today and capture the magic of the season with just a few clicks.
Features:
Christmas Photos
Holiday Photos
Santa Photos
Winter Photos
Christmas Cards
Festive Photos
AI Christmas
Holiday Magic
40 photos included
1,200+ photos generated
November 17, 2025
Remove Glare from Photo Online Free for Flawless Pics
Learn how to remove glare from photo online free with our guide. We cover simple AI fixes and manual techniques to save your pictures from bad lighting.
Yes, it is entirely possible to remove glare from a photo online free using a range of sophisticated web-based tools. Modern editors can either eliminate glare with one-click AI fixes or provide manual controls like clone and heal brushes to carefully erase distracting reflections.
Whether the issue is glare on glasses, windows, or shiny skin, you can transform a flawed picture into a professional-quality image you are proud to share.
Why Glare Wrecks Photos and How Free Tools Save the Day
We have all experienced it: that distracting blast of bright light that washes out a key part of a photo. That's glare. It occurs when a strong light source—such as the sun or a camera's flash—bounces off a reflective surface and directly into the lens. Common culprits include glass, water, or even oily skin.
This reflection is often so intense that it overloads the camera's sensor, creating "blown-out" highlights where all detail is lost.
For years, correcting this issue required expensive software and extensive training. However, the landscape has changed dramatically. As digital photography became ubiquitous, the demand for accessible editing tools soared. According to a 2023 Pew Research Center report, 97% of Americans now own a cellphone, with the vast majority being smartphones used for daily photography. This user base increasingly turns to online AI tools for rapid, effective fixes.
The New Age of Easy Photo Editing
Today, a suite of powerful, free editors operates directly within your web browser. There is no longer a need to download cumbersome programs or pay for subscriptions to fix a common photographic flaw.
"The democratization of photo editing means that anyone with an internet connection can now achieve results that were once exclusive to professional retouchers," states Dr. Alistair Reed, a digital media analyst. "Free online tools have leveled the playing field, making high-quality image correction a simple, intuitive process."
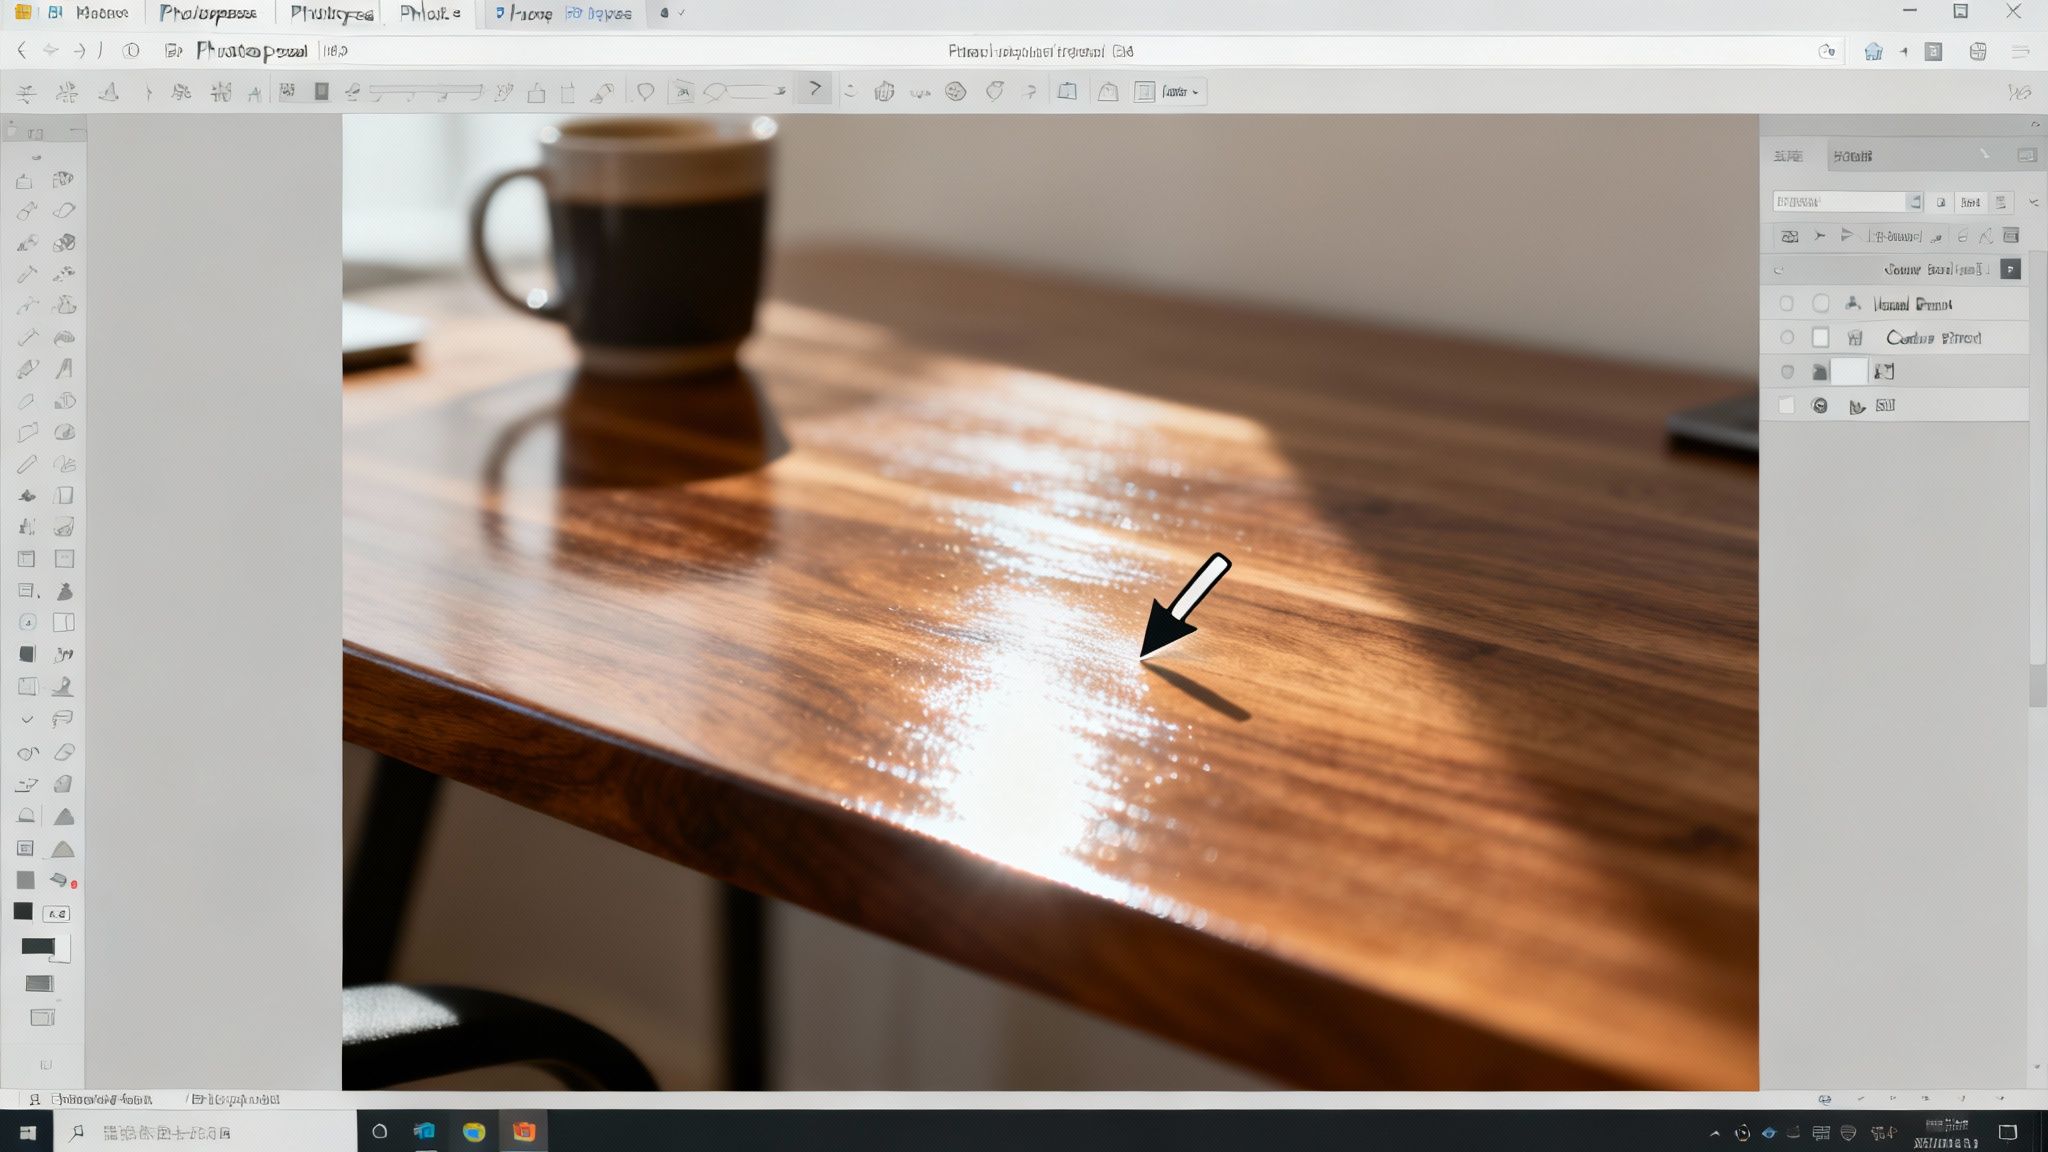
This shift means you no longer have to discard an otherwise excellent photo because of glare. It can be salvaged in minutes. For example, consider the interface of Photopea, a popular free online editor that rivals the capabilities of high-end desktop software.
As you can see, professional-grade tools like layers, masking, and clone stamps are available in your browser, ready for use without any cost.
Which Glare Removal Method Is Right for You?
When you need to remove glare from a photo online free, you have two primary options: a quick, automated AI fix or a more hands-on manual edit. The best choice depends on the severity of the glare and the degree of control you require over the final result.
Before we explore the step-by-step methods, here is a summary of the main techniques, their ideal applications, and the typical effort involved.
Comparing Free Online Glare Removal Methods
Method
Best For
Skill Level
Estimated Time
Automatic AI Fix
Minor to moderate glare on common surfaces (skin, glasses).
Beginner
< 1 Minute
Manual Healing/Cloning
Complex glare, reflections with patterns, or when precision is key.
Intermediate
2-10 Minutes
Curves & Levels Adjustment
Reducing subtle, widespread glare or haze across an entire image.
Intermediate
1-5 Minutes
Strategic Cropping
Glare located near the edge of the photo that can be easily cut out.
Beginner
< 1 Minute
Masking & Blending
Severe glare on detailed areas, like eyes behind glasses.
Advanced
5-15+ Minutes
This table provides a useful starting point. For most situations, an AI tool is the most efficient first step. If it does not produce the desired result, you can proceed to the more precise manual techniques. This guide will cover both, preparing you to tackle any glare-related challenge.
Using AI for Instant One-Click Glare Removal
When you need to remove glare from a photo online free, your fastest and often most effective option is an AI-powered tool. These modern editors do not merely apply a simple filter; they function as a digital assistant trained on millions of images, capable of instantly identifying and correcting distracting reflections.
The AI has "seen" glare on glasses, windows, and shiny surfaces thousands of times. It does not just paint over the bright spot. Instead, it analyzes surrounding pixels to intelligently reconstruct the details hidden beneath the glare, delivering a natural-looking fix in seconds.
How AI Editors Detect and Fix Glare
The technology behind AI glare removal is deep learning. These tools identify complex glare patterns—from reflections on glasses to harsh sun spots—while carefully preserving original details. This prevents distorted faces or unnaturally blurry patches.
This is a significant advancement, especially considering that a study by the Journal of Digital Imaging found that poorly controlled lighting, including glare, can compromise the diagnostic quality of up to 20% of clinical photographs. While consumer photography is different, the principle is the same: glare destroys critical information. It is also a lifesaver for common issues such as:
Glasses Glare: The AI can erase the bright reflection while rebuilding the eye and skin details behind the lens.
Window Reflections: It can remove the reflection of the room (or you!) from the glass, restoring the view outside.
Shiny Skin: It masterfully tones down distracting "hot spots" on foreheads or cheeks for a much more balanced portrait.
The process is remarkably simple. With an editor like PicWish, you upload your image, and the algorithm automatically detects and eliminates the glare. For further creative edits, you can use tools that let you edit your photos by prompt for other instant adjustments.
"Automation through AI is not about replacing the artist; it's about removing the tedious obstacles," notes acclaimed tech journalist Maria Gonzalez. "For issues like glare, a one-click AI tool can achieve in seconds what used to take a skilled retoucher significant time, freeing up creators to focus on the art."
When to Rely on AI and When to Go Manual
AI is an excellent starting point, but it is important to understand its limitations. For moderate, well-defined glare, AI is almost always the correct first move. It is fast, effective, and requires no technical skill.
However, when dealing with extremely severe glare where large sections of the photo are completely blown out, the AI may struggle to accurately reconstruct what was lost. In such cases, I often use the AI to perform the initial heavy lifting, then transition to a manual editor to apply the final, precise touches.
Fixing glare is one aspect, but mastering overall image quality is the ultimate goal. This practical guide to improve image quality is an excellent resource for that. The key is knowing when to leverage automation and when a bit of manual control will make all the difference.
Going Hands-On: Manual Glare Removal in Free Editors
While AI tools are invaluable for quick fixes, they can sometimes leave behind a blurry or unnatural result, especially with complex reflections or textured surfaces. This is when you must take direct control. Using tools like the Clone Stamp and Healing Brush in free online editors like Photopea provides the pixel-level precision required for a truly seamless repair.
Think of it as digital painting. You are not just deleting the glare; you are borrowing pixels from a clean, nearby area of your photo and carefully painting over the problem spot. This manual approach ensures the texture, lighting, and detail of the repaired section blend perfectly. It is the kind of meticulous work that distinguishes a good photo from a great one.
Clone Stamp vs. The Healing Brush: What’s the Difference?
Your two main instruments for this task are the Clone Stamp and the Healing Brush. They sound similar, but understanding their distinct functions is key to choosing the right tool for the job.
The Clone Stamp: This tool is a direct copy-and-paste mechanism. It duplicates pixels from your source area exactly and places them over the target. It is ideal for rebuilding elements with sharp, defined patterns or clean edges where a perfect match is necessary.
The Healing Brush: This tool is more intelligent. It also copies pixels from a source point, but it then blends them with the color and brightness of the area you are painting over. This creates a smoother, more natural transition, making it perfect for organic surfaces like skin, walls, or fabrics.
For most glare issues, particularly on skin or other non-uniform surfaces, the Healing Brush is the preferred starting point. It helps avoid the tell-tale "patched" look. Indeed, professional retouchers rely heavily on these tools; a study in the ACM Transactions on Graphics demonstrated that expert manual retouching can improve perceived image quality by up to 45% over automated methods in complex cases.
Why Your Tool Settings Matter So Much
Simply selecting a tool and painting is insufficient. The true artistry is in the settings. To remove glare from a photo online free and achieve a natural look, you must become proficient with your brush’s opacity and hardness.
"The art of manual retouching lies in subtlety," says Alex Thompson, a professional photo editor with over 15 years of experience. "A low-opacity brush, built up in layers, will always look more natural than one heavy-handed stroke. It’s about gently guiding the pixels, not forcing them."
Start by reducing your brush opacity to between 20-30%. This allows you to build the correction in gentle layers, blending the new texture seamlessly. You should also use a soft brush (low hardness), which creates feathered edges that merge smoothly with the rest of the image. This is how you avoid the harsh, circular outlines that signal an amateur edit.
If you are dealing with smaller blemishes alongside glare, a targeted online blemish remover can often resolve those quickly using similar blending principles.
Clone Stamp vs Healing Brush Tool Settings
Correctly configuring these tools is what separates a clumsy edit from a seamless one. Here is a guide to what each setting does and how to use it effectively.
Setting
Clone Stamp Function
Healing Brush Function
Pro Tip
Size
Controls the diameter of the brush.
Controls the diameter of the brush.
Match the brush size to the glare spot. Go slightly larger for softer blending.
Hardness
Adjusts the softness of the brush edge. 0% is feathered, 100% is a hard circle.
Adjusts the softness of the brush edge.
Always start with a low hardness (0-25%) to avoid harsh edges and create a natural fade.
Opacity
Determines the transparency of the cloned pixels. 100% is a full copy.
Determines the transparency of the healing effect per brush stroke.
Set opacity to 20-40% and build up the effect in layers. It's more work but looks far better.
Source
The area you sample from (Alt/Option-click).
The area you sample texture and detail from.
Choose a source area that closely matches the texture and lighting you want to replicate.
Mastering these settings requires practice, but once you develop a feel for them, you will be able to tackle almost any glare problem with confidence.
Real-World Fix: A Shiny Wood Floor
Imagine a beautiful shot of a polished hardwood floor, ruined by a bright white glare from an overhead light. An AI tool might leave a blurry, distracting patch.
This is a job for the Healing Brush.
First, you would locate a clean spot on the floor nearby that has a similar wood grain but no glare. You would Alt-click (or Option-click on a Mac) to set that as your source. Then, using a soft brush with low opacity, you would begin gently painting over the white reflection. With each stroke, the tool would sample the wood texture from your source and blend it with the color and light of the glared area, gradually building it up until the glare is gone—and the wood grain appears completely untouched.
Advanced Adjustments for Toning Down Minor Glare
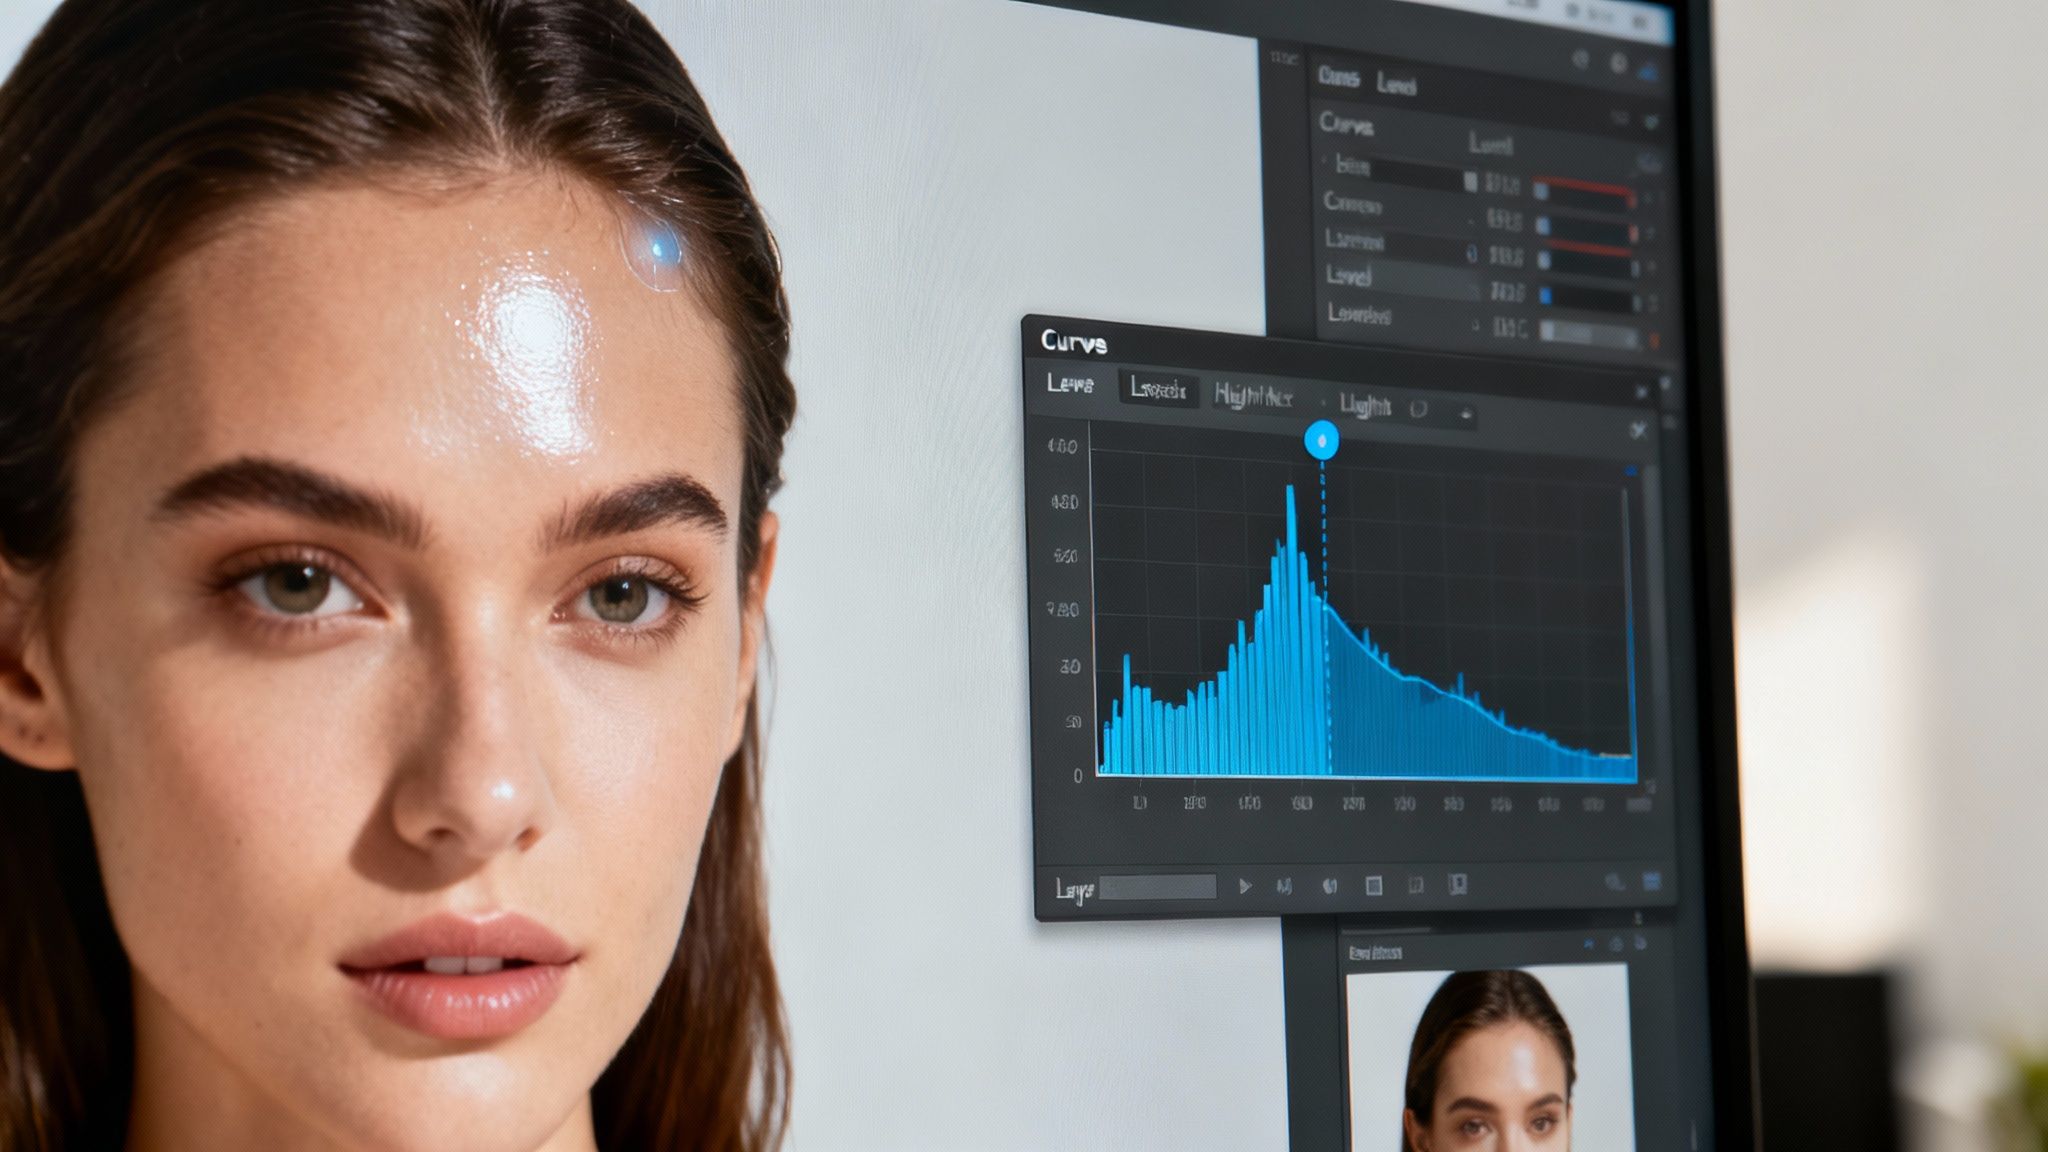
Sometimes, complete obliteration of glare is unnecessary. An aggressive AI fix can appear unnatural, and cloning can leave an obvious patch. For a more subtle approach, we turn to the powerhouse tools of photo editing: Curves and Levels.
This method is less about erasure and more about sculpting light. Consider a portrait where a person's forehead has a distracting "hot spot." Instead of painting over it and destroying the skin's texture, you can specifically target and darken only the brightest parts of the photo. This softens the shine while preserving every natural detail.
Getting Comfortable with Curves and Levels
These tools may appear intimidating, but their core concept is simple. Both Curves and Levels provide a map of your photo's tonal range—from the darkest shadows to the brightest highlights—typically displayed in a histogram.
To reduce glare, focus on the highlight end of the graph. By gently pulling down the top-right part of the curve or sliding the white input level slider inward, you instruct the editor to "make the absolute brightest pixels in my photo slightly darker." This small adjustment can dramatically reduce glare intensity across the entire image.
"Mastering Curves and Levels is a watershed moment for any editor," notes a tutorial from the Adobe Create Magazine. "It’s the difference between merely fixing a photo and truly sculpting the light within it. For minor glare, a subtle S-curve is often all you need to reclaim lost detail in the highlights."
This technique is highly effective for landscape shots with hazy, blown-out skies or portraits with overly shiny skin. Research in visual perception published in the journal Vision Research confirms that human eyes are naturally drawn to the brightest spots in an image. By toning down these distracting hotspots, you guide the viewer's gaze back to your intended subject.
The Pro Move: Using Layer Masks for Precision
Applying a Curves adjustment to the entire image can sometimes darken areas you wish to keep bright. This is where layer masks become essential. This professional technique is available in most capable free online editors. A mask acts as a stencil, allowing you to "paint on" your adjustments with pinpoint accuracy.
Here is how to tackle it in a real-world scenario:
Duplicate Your Layer: First, create a copy of your main photo layer. This non-destructive practice protects your original image from errors.
Apply the Adjustment: On the new layer, use Curves or Levels to darken the highlights. Overdo it slightly—focus on making the glared area look right.
Add and Invert the Mask: Next, add a layer mask to this adjusted layer and immediately fill it with black. This will temporarily hide your adjustment.
Paint to Reveal the Fix: Finally, select a soft, white brush. Begin painting over just the glared areas on the mask. As you paint, you will reveal the darker, corrected layer underneath only where needed, leaving everything else untouched.
This method combines the powerful tonal control of Curves with the precision of a paintbrush. To further explore light and color manipulation, experimenting with a dedicated online color correction tool can greatly expand your capabilities.
How to Prevent and Troubleshoot Glare Problems
While the ability to remove glare from a photo online free is invaluable, prevention is the most effective solution. Avoiding glare in the first place saves hours of editing. It begins with learning to work with the light, not against it.
Often, the simplest professional trick is changing your shooting angle. A slight shift in position can move a bright reflection entirely out of the frame. When shooting through a window, press your lens against the glass and cup your hand around it to block stray light.
Proactive Steps to Minimize Glare
Before you press the shutter button, a few adjustments can make a significant difference. These are standard techniques used by professionals to capture clean, crisp images directly from the camera.
Use a Lens Hood: This is your primary defense. A lens hood acts as a visor for your camera, physically blocking angled sunlight from striking your lens and causing flare. It is an inexpensive and highly effective accessory.
Change Your Angle: Avoid shooting directly into the sun or another bright light source. Position yourself so the light is behind you or to the side, illuminating your subject without shining into your lens.
Find Open Shade: On a bright, sunny day, harsh reflections are unavoidable. The easiest solution is to move your subject into open shade, such as under a large tree or on the shady side of a building. This provides soft, even light that is more flattering and free of glare.
"Reading the light is the first and most fundamental skill of photography," advises professional portrait photographer Sarah Chen. "Before you ever think about post-production, think about your position relative to the sun. Five steps to the left can be the difference between a ruined shot and a perfect one."
This forethought can often eliminate the need for editing. However, glare is sometimes unavoidable, requiring a solid post-production plan.
Tackling Tough Post-Production Challenges
When prevention fails and you face a stubborn reflection that even advanced AI tools cannot fully remove, you must adopt a more hands-on approach.
Consider a large, distracting reflection on a window. A one-click AI fix will likely create a blurry, unnatural patch that signals a poor edit.
In this situation, a hybrid approach is best. Begin with an AI tool to reduce the glare's intensity. Then, move to a manual editor like Photopea. Select the Clone Stamp tool, lower the opacity to 15-20%, and carefully rebuild the details by sampling from a clean part of the window. Layering your edits slowly and patiently is crucial for a seamless blend.
This is not a simple fix; recent research highlights the complexity of removing reflections from high-resolution images. A new AI framework has shown incredible performance on datasets with photos up to 4K, demonstrating how the demand for clean, ultra-high-definition photos is advancing algorithms. You can learn more about these AI photo editing advancements in recent studies.
For stubborn lens flare artifacts—the colorful circles and polygons that appear when shooting into the sun—the Healing Brush is often a better choice than the Clone Stamp. It excels at blending surrounding colors and tones, making the artifacts disappear without leaving obvious circular patches. The key, as always, is patience. Build the correction in subtle layers for an unnoticeable result.
Still Have Questions About Removing Glare?
When tackling complex photo edits, common questions inevitably arise. It is normal to wonder about the capabilities of free tools or how to handle specific issues like glare on glasses. Let's address some of the most frequent queries.
Can I Really Get Rid of All the Glare?
This is a critical question. While modern editing tools are incredibly powerful, completely erasing a massive, "blown-out" highlight—where the area is pure white with no remaining detail—is one of the most difficult challenges in photo editing.
In these extreme cases, the goal shifts from complete removal to significant reduction. Think of it as damage control. AI tools can do a remarkable job of reconstructing lost texture, but prevention is always the best strategy. If you are left with such a problem, your most effective tool will be a manual one like the Clone Stamp, allowing you to paint over the white spot with pixels from another part of the image.
Will Free Online Tools Ruin My Photo's Quality?
This is a valid concern. Fortunately, most reputable free editors, such as Photopea or Pixlr, provide full control over export quality. You can save your work at its original resolution, often with options for a high-quality JPEG (e.g., 90% quality or higher) or a lossless PNG file.
Caution is advised with simpler, one-click AI fixers, which sometimes compress the final image to reduce file size. Always check the "Save" or "Export" settings to ensure you are not inadvertently downgrading your picture. A crucial pro tip: always work on a copy. Never edit your original file.
"Non-destructive editing is not just a technique; it's a mindset," advises the American Society of Media Photographers (ASMP). "Always preserve your original file. The quality of your final image depends as much on your workflow as it does on the tools you use."
What's the Best Free Way to Fix Glare on Glasses?
Glare on glasses is a classic photographic frustration. For this, a two-step approach typically yields the best results. Begin with an AI-powered tool. Many are specifically trained to recognize and fix reflections on lenses and can achieve 80-90% of the desired correction in seconds.
If the AI leaves behind imperfections, transition to an editor like Photopea for the final touches. The Healing Brush is perfect for smoothing out small, awkward spots. For larger fixes where the glare obscures part of the eye or the frame, switch to the Clone Stamp. You can carefully sample from the other, non-glared lens to rebuild the obscured area, ensuring a natural and symmetrical appearance.
Ready to create flawless, professional photos without the hassle of a real photoshoot? DreamShootAI lets you generate stunning, studio-quality images of yourself in any style imaginable. From professional headshots to romantic wedding scenes, bring your vision to life today. Start creating at https://dreamshootai.com.